LemonStand Version 1 Has Been Discontinued
This documentation is for LemonStand Version 1. LemonStand is now offered as a cloud-based eCommerce platform.
You can try the new LemonStand and learn about upgrading here.
Understanding Themes
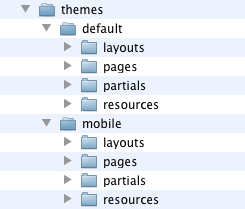
Themes are sets of CMS objects - pages, layouts (templates), partials and resources. Themes completely define a store appearance. Each theme contains its own set of CMS objects. When you install LemonStand, it creates a default theme. Theming feature is disabled for existing stores. If you wish to enable theming in your store, please follow the Enabling the Theming feature tutorial. You can skip this article if you are not going to use multiple themes on your website.
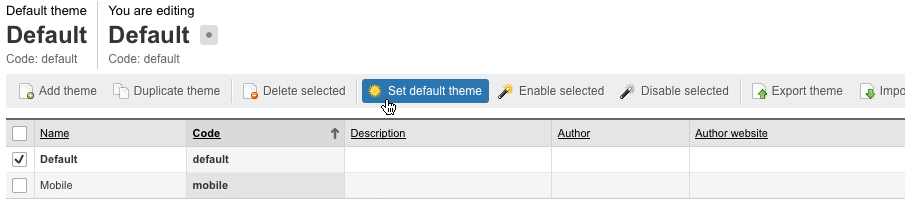
You can manage themes on CMS/Themes page in the Administration Area. You can create unlimited number of themes in a single LemonStand installation. Themes can be enabled manually or automatically, depending on the visitor user agent (mobile phone, iPad, etc.). In the Administration Area you can choose which theme is default and which theme you are ediiting on CMS/Pages, CMS/Partials, CMS/Layouts and CMS/Resources pages. Active theme is selected automatically by LemonStand.
Default theme
Default theme is a theme which is applied to the website by default, when other themes cannot be applied due to user agent filters. A theme can be set default only if has no user agent filters assigned. If you have several themes installed, and no one of them have any user agent filters configured, the default theme will always be used. Only one theme can be default, and there always should be a default theme in any LemonStand installation. You can set your default theme by clicking Set default theme button on the Themes toolbar.
A theme you are editing
On any page of CMS section you can choose a theme which you wish to edit. All CMS pages share the same theme being edited. On Pages, Layouts, Partials and Themes pages click the button with a circle icon below the You are editing header and select theme in the popup window.

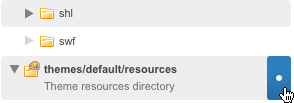
On the Resources page click the button in the theme resources directory row:
Active theme
LemonStand chooses a theme to apply on the website automatically. The theme selection is based on the themes user agent filters, themes status (enabled or disabled) and a default theme. To choose a theme, LemonStand uses the following set of rules and steps:
- Disabled themes are never apply on the website
- Themes with user agent filters are analyzed. First theme which user agent filter matches the current user agent is selected.
- If no theme was applied on thep 2, a default theme used.
Defining user agent filters
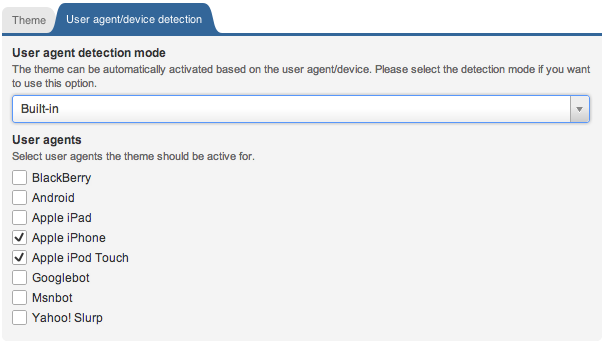
User agent filters determine whether a theme will be applied when the website is viewed from a specific user agent (device). By default user agent filters are disabled for all new themes. You can manage user agent filters on the Create/Edit Theme page. When you define a user agent filter you have two options - use built-in filter or define the filter with a PHP expression.
Using the built-in user agent filter
Built-in filter provides a limited list of mobile devices and does not require any programming skills. Select the Built-in option in the User agent detection mode drop-down menu and select user agents the theme should be aplied to.
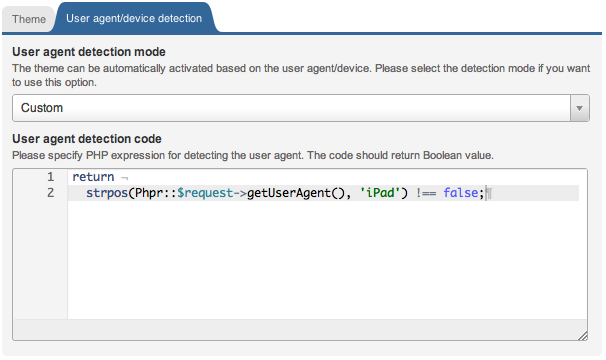
Developing custom user agent filters
Custom user agent filters allow to detect user agent not listed in the built-in filter or implement custom detection logic. To create a custom filter, choose the Custom option in the User agent detection mode drop-down menu and enter a PHP expression in the User agent detection code field. The expression should return Boolean value. The theme will be applied if the expressions returns TRUE.
Theme file resources
As it was said above, each theme has its own set of pages, layouts, partials and resource files. File resources specific for a theme are situated in the themes/theme-code/resources directory. This directory has a separate root node in the Resource Manager.
To create an URL to a file located in the current theme resources directory, use the theme_resource_url() function. This function returns URL string relative to the current theme resources directory. For example, if the current theme code was "mobile", the following call would output "/themes/mobile/resources/images/background.png" string:
<?= theme_resource_url('images/background.png') ?>If you need to refer to a theme-specific files in the resource combiner function calls (js_combine() and css_combine()), use the @ symbol to indicate that a file should be loaded from the current theme resources directory. For example, the following code will create a link to the /themes/mobile/resources/javascript/effects.js file:
<?= $this->js_combine(array('@javascript/effects.js')) ?>The website resources directory (/resources by default) is considered as a container for files which are not specific for any theme, like images for the blog, or custom product pages.
If theming is disabled, theme_resource_url() and resource combiner functions return URLs relative to the website resources directory (/resources by default).
Combining theme resources and templates directories
If you use file-based templates, it is possible to combine theme resources and templates directory. This configuration enables you to store all theme related files in a single themes directory, instead of having 2 separate directories for themes and templates:
To use this option please specify {APP}/themes path as your templates directory on the System/Settings/CMS Settings page:
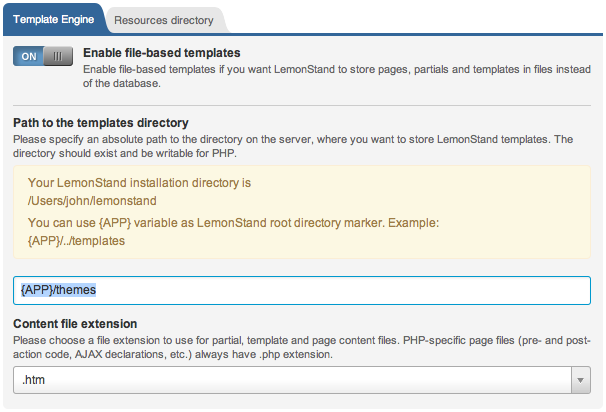
If you already have the file-based templates feature enabled, please first disable it to transfer all files content to the database. After that enable it with the updated path as it described above.
Next: Enabling Theming
Previous: Getting Started
Return to Getting Started