LemonStand Version 1 Has Been Discontinued
This documentation is for LemonStand Version 1. LemonStand is now offered as a cloud-based eCommerce platform.
You can try the new LemonStand and learn about upgrading here.
AJAX
This page continues the Programming pages article.
LemonStand has a simple built-in AJAX framework which allows you to send AJAX request to the server and update page elements without reloading the whole page. The AJAX request consists of 3 steps:
- Send an AJAX request to the server
- Process the request on the server
- Update the page elements
Usually you will only perform the first step of the process – the sending data to the server. The tasks of processing AJAX requests and updating page elements are often solved by LemonStand automatically. This is true for most cases you may need while developing the online store website. The actions provided by LemonStand modules have handlers for AJAX requests like “Add a product to the shopping cart” or “Reset user password”. Often you will only need to issue an AJAX request and LemonStand will take care of the rest.
To use the LemonStand AJAX framework, some JavaScript libraries and a CSS file provided by LemonStand must be included into a page. The minimum required JavaScript and CSS files are described in the Combining and Minifying JavaScript and CSS files article. In this article we will use jQuery-based implementation of the front-end framework. With MooTools implementation you can use the same syntax in your AJAX requests.
Creating an AJAX calculator
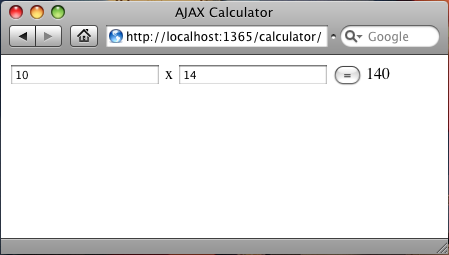
For the demonstration purposes and for custom cases when you may need to handle an AJAX requests manually we have prepared a simple AJAX Calculator tutorial. The Calculator page will have two fields and a button. Values specified in the fields will be multiplied on the server and displayed on the page without reloading the page.
Create a new page and assign it any name and URL. Paste the following code into the page Content page.
<!DOCTYPE html PUBLIC "-//W3C//DTD XHTML 1.0 Strict//EN"
  "http://www.w3.org/TR/xhtml1/DTD/xhtml1-strict.dtd">
<html xmlns="http://www.w3.org/1999/xhtml">
<head>
  <meta http-equiv="content-type" content="text/html; charset=utf-8" />
  <title>AJAX Calculator</title>
  <?= $this->js_combine(array(
  'jquery',
  'ls_core_jquery')) ?>

  <?= $this->css_combine(array('ls_styles')) ?>
</head>
<body>
  <?= open_form() ?>
    <input type="text" name="value1"/> x <input type="text" name="value2"/>
    <input type="button" value="=" onclick="return $(this).getForm().sendRequest(
        'calculate',
        {update: {'update_me': 'result_partial'}})"/>
    <span id="update_me"></span>
  </form>
</body>
</html>
<!DOCTYPE html PUBLIC "-//W3C//DTD XHTML 1.0 Strict//EN"
"http://www.w3.org/TR/xhtml1/DTD/xhtml1-strict.dtd">
<html xmlns="http://www.w3.org/1999/xhtml">
<head>
<meta http-equiv="content-type" content="text/html; charset=utf-8" />
<title>AJAX Calculator</title>
{{ js_combine(['jquery', 'ls_core_jquery']) }}
{{ css_combine(['ls_styles']) }}
</head>
<body>
<?= open_form() ?>
<input type="text" name="value1"/> x <input type="text" name="value2"/>
<input type="button" value="=" onclick="return $(this).getForm().sendRequest(
'calculate',
{update: {'update_me': 'result_partial'}})"/>
<span id="update_me"></span>
</form>
</body>
</html> The form contains two fields and a button. Also it contains a SPAN element with ID="update_me". This element will be updated each time you click the button and will contain a result of the calculation performed on the server.
You may notice that HTML form element is open with the open_form function. This function outputs the FORM tag with ACTION attribute pointing to the current page. It is simpler to use this function than write the ACTION attribute value for each form.
The AJAX request is issued when a visitor click the button - the onclick event handler contains a simple JavaScript code which sends an AJAX request. The following code gives us a closer look of the onclick handler.
return $(this).getForm().sendRequest(
'calculate', {
  update: {'update_me': 'result_partial'}
})
The code first finds the FORM element wrapping the button, using the getForm method of the button. This method is added by LemonStand AJAX framework to all page elements – buttons, links and so on. Then the form method sendRequest is called. The method sendRequest is added by LemonStand as well. The method sends an AJAX request to the server. The AJAX request posts the following information to the server:
- All information contained in the form input elements – values of the two input fields in this case.
- A name of a function to use when handling the AJAX request. In this case – the calculate function. The function name is specified in the first parameter of the sendRequest method.
- A list of page element Ids which you want to be updated at the end of the request. The second parameter of the sendRequest is the options object. The update element of this object can contain a list of 'element id: partial name' pairs, which informs LemonStand which partials should be used for updating corresponding page elements.
Handling AJAX requests on the server
The AJAX request demonstrated in the previous code snipped refers to the calculate function. This function will be executed on the server. We need to create it. Click the AJAX tab in the page editor and insert the following code:
function calculate($controller)
{
  $controller->data['result'] = post('value1')*post('value2');
}
The screenshot demonstrates how the Page Editor should look.
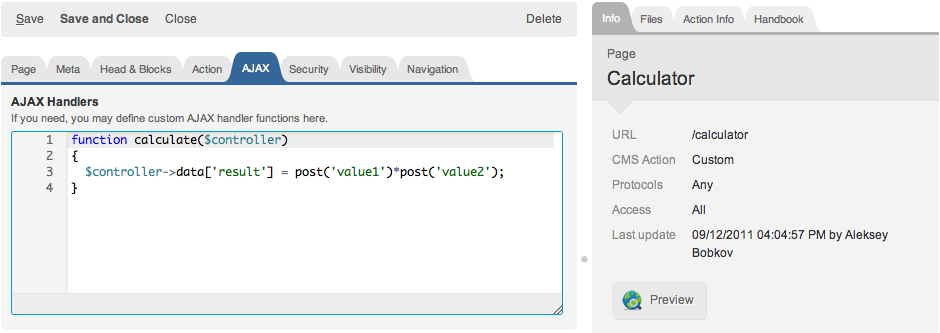
As you can see the handler method is rather simple. It obtains values entered in the text fields and multiplies them. For accessing the POST data the post function is used. Using this function is more preferable than accessing $_POST array.
The result of multiplication is assigned to the controller's data field. The reference to the controller (the Cms_Controller class object) is passed to the function as the first parameter. As we described in the Actions article, the data field is designed for passing values from page actions to the pages, partials and template codes.
Now we are ready to display the result of the value multiplication on the page.
Displaying a result on the page
In the page code we have created a special SPAN element with Id update_me. Also, in the options of sendRequest method we specified the update object:
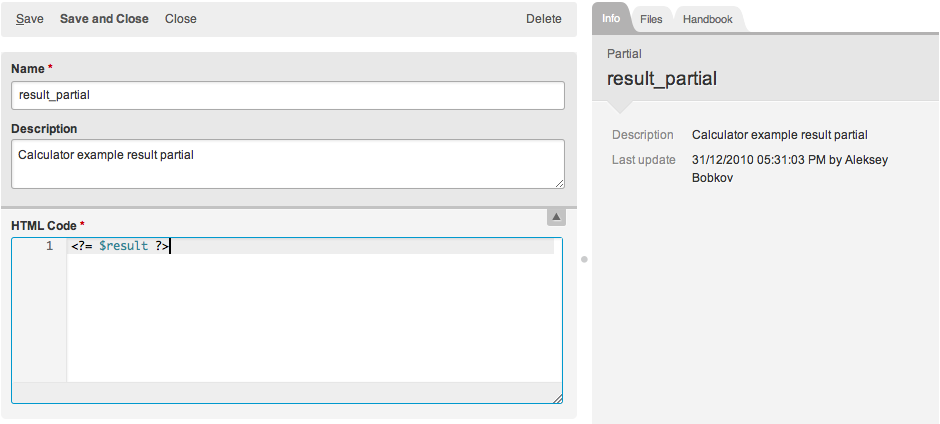
update: {'update_me': 'result_partial'} This object contains IDs of page elements to be updated and names of partials to use for update the elements. You may update as many page elements as you need, with a single AJAX call. But in our case we need to update only one element – the SPAN with ID="update_me". To update it we will use a partial with the name 'result_partial'.
Create a new partial and assign it the name result_partial. The only thing we need to do now is to output the $result variable which we created in the calculate function. The screenshot below displays the view of the Partial editor. Save the partial.
Now all components of the Calculator are done. You can open the page you created for the Calculator and check how it works.
This simple example demonstrated how the technology works. With AJAX you can perform complex updates on a page. For example you can update the cart content without reloading the page. Details about available AJAX event handlers provided by the Shop module are explained in the section Creating Shop Pages.
See also:
Previous: Actions
Return to Programming Pages