LemonStand Version 1 Has Been Discontinued
This documentation is for LemonStand Version 1. LemonStand is now offered as a cloud-based eCommerce platform.
You can try the new LemonStand and learn about upgrading here.
Implementing the Compare Products feature
The LemonStand Shop module has a built-in feature which allows you to implement the product comparison feature. The product comparison feature consists of 3 elements:
- The "Add to Compare" link (or button) in the product list, or on the product details page
- The Compare Products list - an area on the store pages, which contains a list of products added to the comparison list.
- The Compare Products page - a page, which outputs all products, added to the comparison list, side by side, allowing a visitor to compare different product parameters.

Implementing the Compare Products list
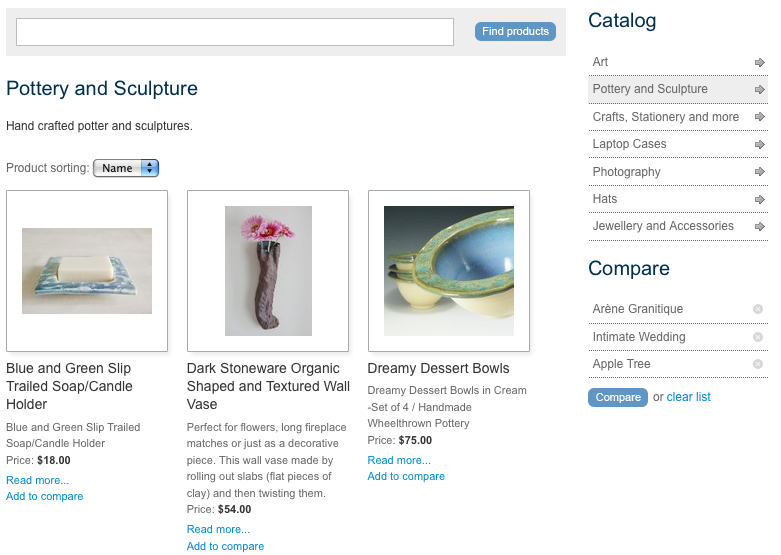
On you store pages you should have an area for displaying a list of products added to the comparison list. On the image above you can see such area on the sidebar, below the Compare header. Create a new partial and assign it some name. In our Demo website we assigned it the shop:compare_list name and we will use this name in the code examples on this page. In the partial code use the Shop_ComparisonList class for accessing a list of products. Also, inside this partial you should display links for removing a product from the list, for clearing the list, and a link for navigating to the Compare Products page. Below is an example of the partial code.
<?= open_form() ?>
  <?
    $compare_product_list = Shop_ComparisonList::list_products();
    if ($compare_product_list->count):
  ?>
    <ul>
      <? foreach ($compare_product_list as $product): ?>
      <li>
        <a href="<?= $product->page_url('product') ?>"><?= h($product->name) ?></a>
        <a href="#" title="Remove product" onclick="$(this).getForm().sendRequest(
          'shop:on_removeFromCompare', {
          extraFields: {product_id: '<?= $product->id ?>'},
          update: {compare_list: 'shop:compare_list'}
        }); return false">Remove</a>
      </li>
      <? endforeach ?>
    </ul>

    <a href="<?= root_url('compare') ?>">Compare!</a>
    <p>or <a href="#" onclick="return $(this).getForm().sendRequest(
      'shop:on_clearCompareList', {
      confirm: 'Do you really want to remove all products from the compare list?',
      update: {compare_list: 'shop:compare_list'}
    });">clear list</a></p>
  <? else: ?>
    <p>The product compare list is empty.</p>
  <? endif ?>
</form>
{{ open_form() }}
  {% set product_list = method('Shop_ComparisonList', 'list_products') %}
  {% if product_list.count %}
    <ul>
      {% for product in product_list %}
      <li>
        <a href="{{ product.page_url('product') }}">{{ product.name }}</a>
        <a href="#" title="Remove product" onclick="$(this).getForm().sendRequest('shop:on_removeFromCompare', {
          extraFields: {product_id: '{{ product.id }}'},
          update: {compare_list: 'shop:compare_list'}
        }); return false">Remove</a>
      </li>
      {% endfor %}
    </ul>

    <a href="<?= root_url('compare') ?>">Compare!</a>
    <p>or <a href="#" onclick="return $(this).getForm().sendRequest(
      'shop:on_clearCompareList', {
      confirm: 'Do you really want to remove all products from the compare list?',
      update: {compare_list: 'shop:compare_list'}
    });">clear list</a></p>
  {% else %}
    <p>The product compare list is empty.</p>
  {% endif %}
{{ close_form() }}
After creating the partial you can render it in your templates, using the render_partial() controller method call. Also, you need to wrap the partial content into a DIV element for updating it using AJAX. This DIV element must have a specific ID assigned, for referring it in AJAX call. In our examples we assigned the "compare_list" identifier to the DIV element. Example of the Compare Products partial rendering:
<h2>Compare</h2>
<div id="compare_list">
  <? $this->render_partial('shop:compare_list') ?>
</div>
<h2>Compare</h2>
<div id="compare_list">
  {{ render_partial('shop:compare_list') }}
</div>
Implementing the Add to Compare buttons
You can add the Add to Compare links or buttons in the product list, or on the product details page - or anywhere where you can access a product identifier. The link or button should invoke the shop:on_addToCompare AJAX handler and pass a product identifier to it. Below is an example of code which you can use in your product lists, or on the product details page. The code creates a link for adding a product to the comparison list. It also updates the Compare Products area on the page, and displays a popup message.
 <a href="#" onclick="return $(this).getForm().sendRequest(
  'shop:on_addToCompare', {
  onSuccess: function(){alert('The product has been added to the compare list')},
  extraFields: {product_id: '<?= $product->id ?>'},
  update: {compare_list: 'shop:compare_list'}
});">Add to compare</a>
<a href="#" onclick="return $(this).getForm().sendRequest(
'shop:on_addToCompare', {
onSuccess: function(){alert('The product has been added to the compare list')},
extraFields: {product_id: '{{ product.id }}'},
update: {compare_list: 'shop:compare_list'}
});">Add to compare</a>Creating the Compare Products page
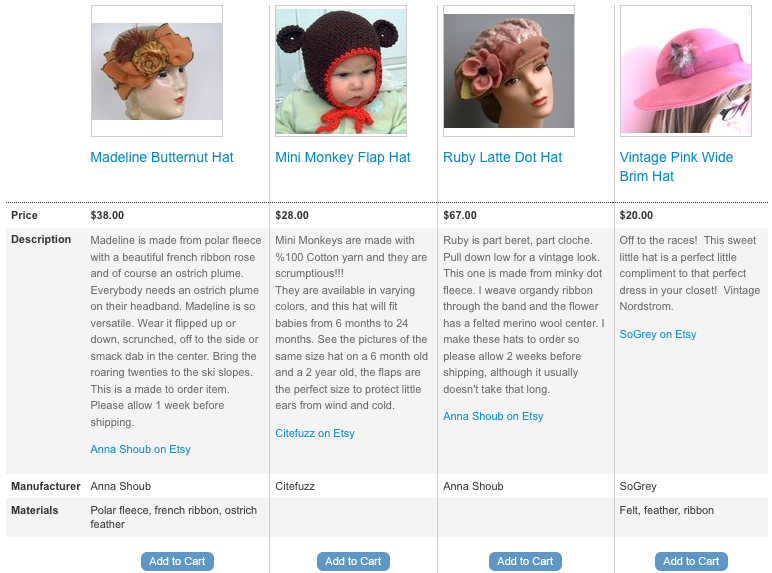
The Compare Products page contains a list of products previously added to the comparison list, displayed side by side on a page. Create a new page, and select the shop:compare action on the Action tab. This action creates two PHP variables on your page: the $products and the $attributes. The $products variable is a collection of products added to the list. The $attributes variable is an array of product attribute names, which you can display on the page. The page should display a table, with products on columns, and product attributes in rows. The $attributes variable contains all attributes of all products in the list. For example, if you defined the Materials attribute for one product, and the Sizes attribute for another products, the variable will contain the both. Other product properties, like description, name, price and others you can add manually.

On the image above the price, description and manufacturer rows were added manually (hard coded) and displayed for all products. The Materials row is a product attribute, and it was added automatically, because some of the selected products has the Materials attribute. Below is an example of the Compare Products page.
<h2>Compare Products</h2>
<?= open_form() ?>
<? if (!$products->count): ?>
<p>The product compare list is empty</p>
<? else: ?>
<table>
<thead>
<tr>
<td> </td>
<? foreach ($products as $product): ?>
<td>
<? if ($image_url = $product->image_url(0, 130, 130)): ?>
<img src="<?= $image_url ?>" alt="<?= h($product->name) ?>"/>
<? endif ?>
<h3><a href="<?= $product->page_url('product') ?>"><?= h($product->name) ?></a></h3>
</td>
<? endforeach ?>
</tr>
</thead>
<tbody>
<tr class="<?= zebra('compare') ?>">
<th>Price</th>
<? foreach ($products as $product):
$is_on_sale = $product->is_on_sale();
?>
<td>
<strong class="<?= $is_on_sale ? 'old_price' : null ?>">
<?= format_currency($product->price()) ?>
</strong>
<? if ($is_on_sale): ?>
<strong class="sale_price">
<?= format_currency($product->get_sale_price(1)) ?>
</strong>
<? endif ?>
</td>
<? endforeach ?>
</tr>
<tr class="<?= zebra('compare') ?>">
<th>Description</th>
<? foreach ($products as $product): ?>
<td class="product"><?= $product->description ?></td>
<? endforeach ?>
</tr>
<tr class="<?= zebra('compare') ?>">
<th>Manufacturer</th>
<? foreach ($products as $product): ?>
<td class="product"><?= $product->manufacturer ? h($product->manufacturer->name): null ?></td>
<? endforeach ?>
</tr>
<? foreach ($attributes as $attribute): ?>
<tr class="<?= zebra('compare') ?>">
<th><?= h($attribute) ?></th>
<? foreach ($products as $product): ?>
<td class="product"><?= h($product->get_attribute($attribute)) ?></td>
<? endforeach ?>
</tr>
<? endforeach ?>
<tr>
<td> </td>
<? foreach ($products as $product): ?>
<td class="product"><input onclick="return $(this).getForm().sendRequest(
'shop:on_addToCart', {
extraFields: {product_id: '<?= $product->id ?>'},
onSuccess: function(){alert('The product has been added to the cart')},
update: {'mini_cart': 'shop:mini_cart'}})"
type="button" value="Add to cart""/>
</td>
<? endforeach ?>
</tr>
</tbody>
</table>
<? endif ?>
</form>
<h2>Compare Products</h2>
{{ open_form() }}
{% if not products.count %}
<p>The product compare list is empty</p>
{% else %}
<table>
<thead>
<tr>
<td> </td>
{% for product in products %}
<td class="product">
{% set image_url = product.image_url(0, 130, 130) %}
{% if image_url %}
<img src="{{ image_url }}" alt="{{ product.name }}"/>
{% endif %}
<h3><a href="{{ product.page_url('product') }}">{{ product.name }}</a></h3>
</td>
{% endfor %}
</tr>
</thead>
<tbody>
<tr class="{{ zebra('compare') }}">
<th>Price</th>
{% for product in products %}
{% set is_on_sale = product.is_on_sale() %}
<td class="product">
<strong class="{{ is_on_sale ? 'old_price' : null }}">
{{ product.price|currency }}
</strong>
{% if is_discounted %}
<strong class="sale_price">
{{ product.get_sale_price(1)|currency }}
</strong>
{% endif %}
</td>
{% endfor %}
</tr>
<tr class="{{ zebra('compare') }}">
<th>Description</th>
{% for product in products %}
<td class="product">{{ product.description|unescape }}</td>
{% endfor %}
</tr>
<tr class="{{ zebra('compare') }}">
<th>Manufacturer</th>
{% for product in products %}
<td class="product">{{ field(product, 'manufacturer') ? field(product, 'manufacturer').name : null }}</td>
{% endfor %}
</tr>
{% for attribute in attributes %}
<tr class="{{ zebra('compare') }}">
<th>{{ attribute }}</th>
{% for product in products %}
<td class="product">{{ product.get_attribute(attribute) }}</td>
{% endfor %}
</tr>
{% endfor %}
<tr>
<td> </td>
{% for product in products %}
<td class="product"><input onclick="return $(this).getForm().sendRequest(
'shop:on_addToCart', {
extraFields: {product_id: '{{ product.id }}'},
onSuccess: function(){alert('The product has been added to the cart')},
update: {'mini_cart': 'shop:mini_cart'}})"
type="button" value="Add to cart"/>
</td>
{% endfor %}
</tr>
</tbody>
</table>
{% endif %}
</form>Next: Manufacturer List page
Previous: Creating the Search page
Return to Advanced Features for your Online Store
