LemonStand Version 1 Has Been Discontinued
This documentation is for LemonStand Version 1. LemonStand is now offered as a cloud-based eCommerce platform.
You can try the new LemonStand and learn about upgrading here.
How to Support File Uploads on the Product Page
You can allow your customers to customize products before adding them to the shopping cart by allowing uploading files on the Product Details page. There are many possible applications for this feature. For example, you can allow your customers to customize a t-shirt with an image they like.
File upload support does not require developing any custom modules. You only need to add file fields to the product details page and create a partial for displaying the product list. If you used the default store template as the base for your store, you need to modify the product_partial partial.
Creating file controls
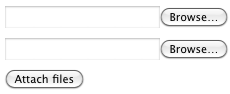
File controls are form file input elements. You can add multiple file controls to the product details page. The file input elements should have the following name: product_file[]. Example:
<input type="file" name="product_file[]"/><br/>
<input type="file" name="product_file[]"/><br/>
The code above creates 2 file elements, allowing visitors to upload 2 files at a time. You can add more file controls, or you can leave only a single file control.
Below the file controls you need to create a submit form element for sending files to the server. The submit element can have any name and value.
<input type="submit" value="Attach files"/>
Creating the file list
You need to create a file list to display files uploaded by the customer. As we are going to update the file list using AJAX, you need to create a separate partial, for example product_file_list. The partial code loads a list of uploaded files from the product object and outputs them as a HTML list. Also it creates the Delete link for each file.
<?
  $files = $product->list_uploaded_files();
  if ($files->count):
?>
  <ul>
    <? foreach ($files as $file): ?>
      <li>
        <?= h($file->name) ?>
        | <a href="#" onclick="return $(this).getForm().sendRequest('shop:on_deleteProductFile',
            {update: {'file_list': 'product_file_list'},
            extraFields: {file_id: <?= $file->id ?>}})">delete</a>
      </li>
    <? endforeach ?>
  </ul>
<? else: ?>
  <p>No uploaded files found</p>
<? endif ?>
{% set files = product.list_uploaded_files() %}
{% if files.count %}
  <ul>
    {% for file in files %}
      <li>
        {{ file.name }}
        | <a href="#" onclick="return $(this).getForm().sendRequest('shop:on_deleteProductFile',
            {update: {'file_list': 'product_file_list'},
            extraFields: {file_id: {{ $file.id }}}})">delete</a>
      </li>
    {% endfor %}
  </ul>
{% else %}
  <p>No uploaded files found</p>
{% endif %}
Please note that the Delete link refers the file_list element. You need to create a DIV element with this identifier on the product page (the product_partial partial) and render the product list partial insider it:
<div id="file_list">
  <? $this->render_partial('product_file_list') ?>
</div>
<div id="file_list">
  {% render_partial('product_file_list') %}
</div>
Displaying images in the file list
The list_uploaded_files() method of the Shop_Product class returns a collection of the Db_File objects. The Db_File class has methods which allow you to determine whether the uploaded file is an image and create thumbnail. You can use the following code for displaying thumbnails for image files:
<? if ($file->is_image()): ?>
  <img src="<?= $file->getThumbnailPath(100, 'auto') ?>"/>
<? endif ?>
{% if file.is_image() %}
  <img src="{{ file.getThumbnailPath(100, 'auto') }}"/>
{% endif %}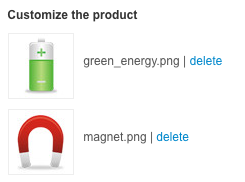
Handling file uploads
When visitors upload product files, LemonStand triggers two events: shop:onBeforeProductFileAdded and shop:onAfterProductFileAdded. You can use these events for handling file uploads. For example, if your product implies only a single image for customization, when a visitor uploads a new file, you can delete a file which has been uploaded earlier. If you want to handle the file uploading events, you need to develop a simple module and define event handlers as it is described in this article.
The following code example defines a handler for the shop:onAfterProductFileAdded event. The handler removes all files which have been added to the product before.
public function subscribeEvents()
{
  Backend::$events->addEvent('shop:onAfterProductFileAdded', $this, 'after_file_added');
}

public function after_file_added($product, $new_file)
{
  $files = $product->list_uploaded_files();
  foreach ($files as $file)
  {
    if ($file->id != $new_file->id)
      $file->delete();
  }
}
Accessing the file list in the Administration Area
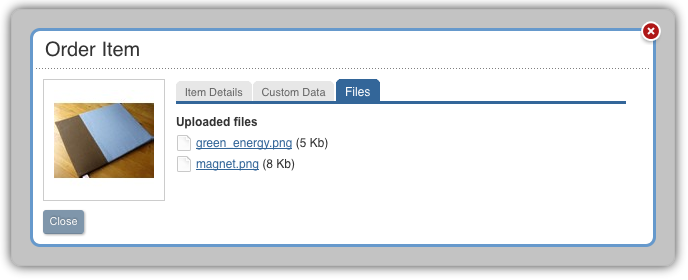
You can view a list of uploaded files on the Order Preview page in the Administration Area. Click an order item in the list and then click the Files tab. You will see a list of files uploaded by the customer. You can click a file to download it.
Next: How to Use Partials Instead of Flash Messages
Previous: How to Enable Customers to Customize Products
Return to Tips and Tricks