LemonStand Version 1 Has Been Discontinued
This documentation is for LemonStand Version 1. LemonStand is now offered as a cloud-based eCommerce platform.
You can try the new LemonStand and learn about upgrading here.
How to Allow Customers to Provide Item Specific Information
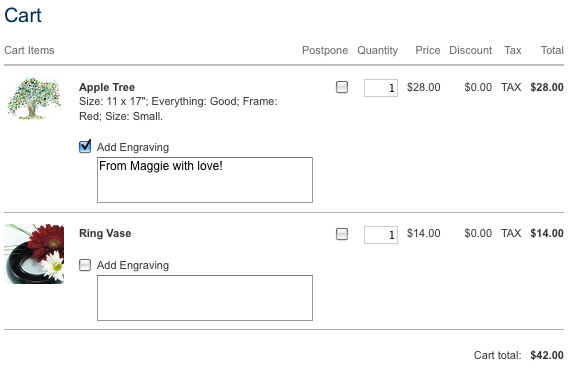
LemonStand allows you to add item-specific form controls to the product list on the Cart page. Using these controls your customers can customize items. For example, you you can add controls allowing visitors to enter engraving text for each order items.
To implement item specific controls you need to develop a simple module, which will extend the cart item and order item models. We created a module template, which adds two fields to the models - "Add Engraving" and "Engraving Text". You can replace these fields with any other fields, and add new fields to the module. You can read about LemonStand module development in this article.
Download the module template archive: democartdata.zip
Installing the module template
Extract the module template archive to the modules directory of your LemonStand installation.
Before using the module, please rename the module directory. According the module naming rules, the module name should contain a name of your company, and should not contain underscores. After renaming the module directory, rename the democartdata_module.php script (you will find it in the classes directory) - replace the "democartdata" prefix with the name of your module. Inside this script you will find a PHP class declaration which should also be renamed. Its name should match the script name, but could contain capital letters.
Inside the updates directory of the module class you will find an SQL script (1.sql) which adds new fields to the customer shopping cart item (shop_customer_cart_items) and order (shop_order_items) item tables. The custom field should be added to the both of the tables, and their names should match in the both of the tables.
By the naming convention, fields added by third-party modules should have the x_ prefix. You can use any MySQL data types suitable for your fields. Use the tinyint type for checkbox fields.
After updating the 1.sql script, log out from the Administration Area and log in again. At this point LemonStand will create new fields in the database.
Updating the module code
The module classes directory contains the module information class. It defines form columns and form fields. You need to update PHP code in the extend_order_item and extend_order_item_model functions in accordance with the field names you created in the database. Change the column names in the first argument of the define_column() and add_form_field() functions and update the field titles. If you have more or less custom fields than the module template contains, remove or add corresponding define_column() and add_form_field() function calls.
Updating the cart page
LemonStand does not create any controls on the Cart page automatically. You need to update the partial which displays the list of products in the cart manually. If you used the demo store template as the base for your store, you need to update the shop:cart_table partial.
This partial contains a table which displays items the customer added to the cart. You can the new controls to the first table column, or create a separate table row for each cart item. Below is a code which displays a checkbox and a text field below a name of each cart item.
<label>Add Engraving</label>
<input type="checkbox" value="1"
  name="item_data[<?= $item->key ?>][x_add_engraving]"
  <?= checkbox_state($item->get_data_field('x_add_engraving')) ?>/>

<textarea
  name="item_data[<?= $item->key ?>][x_engraving_text]"><?= h($item->get_data_field('x_engraving_text')) ?></textarea>
<label>Add Engraving</label>
<input type="checkbox" value="1"
name="item_data[{{ item.key }}][x_add_engraving]"
{{ checkbox_state(item.get_data_field('x_add_engraving')) }}/>
<textarea
name="item_data[{{ item.key }}][x_engraving_text]">{{ item.get_data_field('x_engraving_text') }}</textarea>Please note that the name attribute of the custom controls has the following format: item_data[key][x_field_name]. To load a value of a custom field from the cart item object use the $item->get_data_field() call, passing the field name as a function parameter.
LemonStand saves custom field values to the database each time when the visitor clicks the Apply Changes button.
Viewing custom data in the Administration Area
In the Administration Area you can view the list of custom fields by clicking an order item on the Order Preview page:

You can also edit custom fields on in the Create/Edit Order page, when you are adding a product to the order.
Adding custom order item data to email notifications
You can alter the order_content compound email variable and add item-specific information provided by your customers to email notifications. To change the existing compound email variables, or create new variables please go to the Settings/Email Templates/Manage compound variables page.
In the order_content variable code you have access to the $items array. Each element of this array contains a reference to the Shop_OrderItem object. This object has all fields which you defined in your custom module. Below is a code example which adds a value of the x_engraving_text field for each order item, below the product name:
<td>
<?= $item->output_product_name() ?>
<? if ($item->x_add_engraving): ?>
<br/>Engraving text: <?= h($item->x_engraving_text) ?>
<? endif ?>
</td>
<td>
{{ item.output_product_name() }}
{% if item.x_add_engraving %}
<br/>Engraving text: {{ item.x_engraving_text }}
{% endif %}
</td>
Making product-specific custom fields
If you do not need to display custom fields for some products, or if you need the custom fields to be product-specific, you can extend the product model and add some field which value you can set in the Create/Edit Product form in the Administration Area. For example, you can add the "Allows engraving" field and then use a value of this field in the shop:cart_table partial to hide or show the custom fields.
The process of extending the product model and product form is explained on this page. You can download a module template for extending the product model on this page. After adding a field to the product model, you can access it in the shop:cart_table partial. For example, of you added the x_allows_engraving field to the product model you can use it in the following way:
<? if ($item->product->x_allows_engraving): ?>
<label>Add Engraving</label>
<input type="checkbox" value="1"
name="item_data[<?= $item->key ?>][x_add_engraving]"
<?= checkbox_state($item->get_data_field('x_add_engraving')) ?>/>
<textarea
name="item_data[<?= $item->key ?>][x_engraving_text]"><?= h($item->get_data_field('x_engraving_text')) ?></textarea>
<? endif ?>{% if item.product.x_allows_engraving %}
<label>Add Engraving</label>
<input type="checkbox" value="1"
  name="item_data[{{ item.key }}][x_add_engraving]"
  {{ checkbox_state(item.get_data_field('x_add_engraving')) }}/>

<textarea
  name="item_data[{{ item.key }}][x_engraving_text]">{{ item.get_data_field('x_engraving_text') }}</textarea>
<? endif ?>Next: How to Enable Customers to Customize Products
Previous: How to Display Sale Products
Return to Tips and Tricks