LemonStand Version 1 Has Been Discontinued
This documentation is for LemonStand Version 1. LemonStand is now offered as a cloud-based eCommerce platform.
You can try the new LemonStand and learn about upgrading here.
Extending Existing Models
LemonStand API allows you to add new fields to existing business entities - customers, products and orders. It helps to solve the following tasks:
- Extend customers - add new fields to the Customer model and assign them values during the checkout or from the Create/Edit Customer form in the Administration Area. Below we will demonstrate how you can extend the customer model with the Middle Name field.
- Extend orders - add new fields to the Order model. You can assign values to the added fields using the Create/Edit form in the Administration Area, or during the checkout.
- Extend products - add new fields the Product model and display the field values on the front-end website.
In order to extend existing models, you need to handle specific events, which LemonStand sends through the built-in event system. To subscribe to system events, you need to override the subscribeEvents() method in the module information class. The module information class is described in the Developing a simple module article.
Inside the subscribeEvents() method you can subscribe to specific events by calling the Backend::$events->addEvent() method. This method has 3 parameters: an event name, an object which contains the event handler function, and a name of the event handler function. Usually you will define event handler functions right in the module information class, so the second parameter will refer to the $this PHP variable. Below is an example of the overridden subscribeEvents() method:
public function subscribeEvents()
{
  Backend::$events->addEvent('shop:onExtendCustomerForm', $this, 'extend_customer_form');
}
The code subscribes the module information class to the shop:onExtendCustomerForm event. The second parameter of the addEvent() method refers to the $this variable. It means that the event handler function is defined in the module information class. The last parameter contains a name of the event handler function - extend_customer_form in our case. This function should be declared in the module information class as a public class method:
public function extend_customer_form($customer)
{
  /*
   * Some PHP code for extending the customer form
   */
}
You can use any names for the event handler functions. From examples in this article you can infer that the event handler names are predefined, but this is not so.
Parameters, which are passed to an event handler function, depend on a specific event. The shop:onExtendCustomerForm event passes a single parameter to its handlers - a reference to the customer object to extend. You will find a list of parameters for each specific event below in this article.
LemonStand fires two separate events for extending existing objects - one event for adding a column definition, and another event for adding a field to the Administration Area forms. As any new field requires a corresponding column in the database, your module should create all needed fields, using the update approach described in the Creating and updating database tables article. We will not repeat the explanation here, but you should remember that the database update should be applied by your module, but not by the Shop module. You should not modify the Shop module for adding new features to your store.
In order to avoid conflicts between custom columns added to existing database tables by different modules, always add the x_module_identifier_ prefix to all field columns your module creates. For example: x_mymodule_middle_name - a suitable name for the customer middle name column, created by some module with the "My Module" name.
Another important thing about new field names is that you should not use fields with same names for customer, order and product tables, otherwise it could confuse the LemonStand database engine during the checkout process and it will apply, for example, customer field values to order table fields.
Extending customers
To extend the customer model, your module should handle the following events:
- shop:onExtendCustomerModel - allows to add new column definitions to a customer model object.
- shop:onExtendCustomerForm - allows to add new form fields to the Create/Edit Customer form in the Administration Area.
Both events pass a single parameter to their handlers - a reference to the Shop_Customer object, which should be extended. For the demonstration purposes we will extend the customer model with the Middle Name field. Before we extend the customer model we must create a corresponding field in the shop_customers table. You can do it by creating an update file containing the following SQL query:
alter table shop_customers add column x_mymodule_middle_name varchar(100);
After adding the column the customer table, we can extend the customer model by subscribing and handling corresponding events. The example code below subscribes a module information class to the shop:onExtendCustomerForm and shop:onExtendCustomerModel events:
public function subscribeEvents()
{
  Backend::$events->addEvent('shop:onExtendCustomerModel', $this, 'extend_customer_model');
  Backend::$events->addEvent('shop:onExtendCustomerForm', $this, 'extend_customer_form');
}
The extend_customer_form() and extend_customer_model() functions must be defined in the module information class in the following way:
public function extend_customer_model($customer)
{
  $customer->define_column('x_mymodule_middle_name', 'Middle Name')->validation()->fn('trim');
}

public function extend_customer_form($customer)
{
  $customer->add_form_field('x_mymodule_middle_name')->tab('Customer');
}
As you can see, inside the shop:onExtendCustomerModel event handler we call the define_column() method of the model object. The even handler is similar to the define_columns() method of the model class. The define_columns() method is described in detail in the Lists article. Inside the event handler you can define any columns and validation rules for them.
The shop:onExtendCustomerForm event handler is very similar to the define_form_fields() method of the model class, which is described in the Forms article. Please note that forms for editing customers, orders and products in LemonStand have tabs. When you add new fields to the models, you need to specify a tab you want the field to be placed on.
After extending the customer model, the new field becomes available in the customer list, and on the Customer Preview and Create/Edit Customer forms:
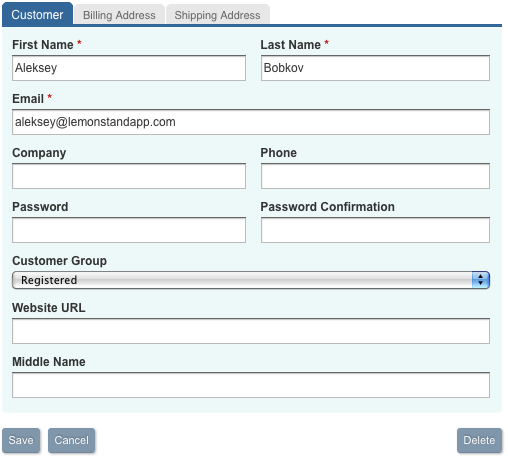
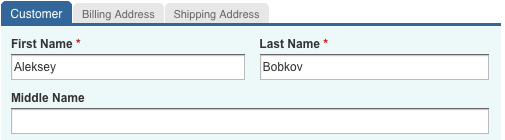
By default LemonStand places new fields to the bottom of the form. You can specify an exact location for a field using the sortOrder() method of the form field definition object:
public function extend_customer_form($customer)
{
  $customer->add_form_field('x_mymodule_middle_name')->tab('Customer')->sortOrder(21);
}
A value you pass to the sortOrder() method specifies an order of the field on the form. Default form fields have orders with step 10. If you look to the default Customer form, you will see that the first 2 fields on the form are the First Name and Last Name. Sort orders for these fields are 10 and 20. Thus, if we want to place a new field after the Last Name field, we need to specify a sort order value between 20 and 30.
Now you can assign values to the customer middle name column using the Administration Area Create/Edit Customer from. Also, you can allow your customers to specify a middle name during the checkout.
Adding the customer middle name to the checkout forms
LemonStand can save values of custom fields, provided during on any step of the checkout process. You only need to add corresponding input elements to the checkout forms. Below is an example code of the Billing Info partial. The code adds the Middle Name field to the Billing Information checkout form:
<label for="x_mymodule_middle_name">Middle name</label>
<input
    name="x_mymodule_middle_name"
    id="x_mymodule_middle_name"
    value="<?= h(Shop_CheckoutData::get_custom_field('x_mymodule_middle_name')) ?>"
    type="text"/>
The code uses the Shop_CheckoutData::get_custom_field() method for obtaining a value of the middle name, previously saved to the session. It allows a customer to leave and return to the Billing Information form, without losing the field value.
Extending orders
The process of extending the order model is very similar to extending the customer model, described in the previous section. To extend the order model you need to handle the following events:
- shop:onExtendOrderModel - allows to add new column definitions to an order model object.
- shop:onExtendOrderForm - allows to add new form fields to the Create/Edit Order form in the Administration Area.
Both events pass a single parameter to their event handlers - an object of the Shop_Order class. In order to add a column to the order model, you will also need to add a corresponding column to the shop_orders table. You can also add custom order fields to the checkout steps and they will be saved to the database automatically, in the same way as it is described in the Extending Customers section above.
Extending products
Extending products is a process similar to extending customers. To extend the product model the following events should be handled:
- shop:onExtendProductModel - allows to add new column definitions to a product model object.
- shop:onExtendProductForm - allows to add new form fields to the Create/Edit Product form in the Administration Area.
- shop:onGetProductFieldOptions - allows to set options for drop-down lists.
Both events pass a single parameter to their event handlers - an object of the Shop_Product class. In order to add a column to the product model, you will also need to add a corresponding column to the shop_products table.
Unlike the customer and order fields, you cannot update product fields from the front-end website. You can only access custom fields and display them in the catalog, in the similar way as you do with any standard product field. For example, if you added the x_mymodule_special_description field to a product, you can output it in your catalog with the following code:
<?= h($product->x_mymodule_special_description) ?>
Creating drop-down product fields
To create a drop-down field and populate it manually, you need to handle the shop:onGetProductFieldOptions event in your module. Please note, that if you are adding a relation column, drop-down fields are populated automatically. Example of using the shop:onGetProductFieldOptions event:
public function subscribeEvents()
{
  Backend::$events->addEvent('shop:onExtendProductModel', $this, 'extend_product_model');
  Backend::$events->addEvent('shop:onExtendProductForm', $this, 'extend_product_form');
  Backend::$events->addEvent('shop:onGetProductFieldOptions', $this, 'get_product_field_options');
}

public function extend_product_model($product)
{
  $product->define_column('x_product_shape', 'Product shape');
}

public function extend_product_form($product, $context)
{
  $product->add_form_field('x_product_shape')->tab('Product')->renderAs(frm_dropdown);
}

public function get_product_field_options($field_name, $current_value)
{
  if ($field_name == 'x_product_shape')
  {
    $options = array('square'=>'Square', 'circle'=>'Circle', 'triangle'=>'Triangle');
    if ($current_value == -1)
      return $options;

    if (array_key_exists($current_value, $options))
      return $options[$current_value];
  }
}
Extending manufacturers
Please use the following events for extending the manufacturer model:
- shop:onExtendManufacturerForm - allows to add new column definitions to a manufacturer model object.
- shop:onExtendManufacturerModel - allows to add new form fields to the Create/Edit Manufacturer form in the Administration Area.
Module templates
On the Module Templates page you can download templates of modules which extend some existing LemonStand models.
Next: Extending Models with Related Columns
Previous: Guide for Developing a Payment Module
Return to Extending LemonStand