LemonStand Version 1 Has Been Discontinued
This documentation is for LemonStand Version 1. LemonStand is now offered as a cloud-based eCommerce platform.
You can try the new LemonStand and learn about upgrading here.
Creating a Customer Registration Page
The customer registration page allows new customers to register in your store. The page contains a form with fields for entering a customer's name and email. After submitting the registration data, the customer receives an email message with login information.

To create a registration page, start with creating a new page and specify some name and URL for it. The values of the name and URL can be anything. Go to the Action tab and select the shop:login action from the drop-down menu.
Note. The shop:login action can also be used for processing the customer registration form. That allows you to combine the login and signup forms on a single page.
The following code snippet contains a simple registration form.
<?= open_form() ?>
  <?= flash_message() ?>
  <label for="first_name">First Name</label>
  <input name="first_name" value="<?= h(post('first_name')) ?>" id="first_name" type="text"/><br/>

  <label for="last_name">Last Name</label>
  <input name="last_name" value="<?= h(post('last_name')) ?>" id="last_name" type="text"/><br/>

  <label for="signup_email">Email</label>
  <input id="signup_email" type="text" name="email" value="<?= h(post('email')) ?>"/><br/>

  <input type="submit" name="signup" value="Register"/>
  <input type="hidden" name="redirect" value="/registration_thankyou"/>
</form>
{{ open_form() }}
  {{ flash_message() }}
  <label for="first_name">First Name</label>
  <input name="first_name" value="{{ post('first_name') }}" id="first_name" type="text"/><br/>

  <label for="last_name">Last Name</label>
  <input name="last_name" value="{{ post('last_name') }}" id="last_name" type="text"/><br/>

  <label for="signup_email">Email</label>
  <input id="signup_email" type="text" name="email" value="{{ post('email') }}"/><br/>

  <input type="submit" name="signup" value="Register"/>
  <input type="hidden" name="redirect" value="/registration_thankyou"/>
</form>
The code outputs the HTML FORM element using the open_form function. The flash_message function used to output form error messages. Please note you should not change the input element's names and Ids. The submit element name should have the signup name. The optional redirect hidden field allows you to specify a URL of a page you want the visitor to be redirected to after successful registration.
Allowing customers to specify a password during the registration
By default LemonStand generates customer passwords automatically. But you can add the password and password confirmation fields to the registration form. Example:
<label for="password">Password</label>
<input id="password" type="password" name="password" value="" autocomplete="off"/>

<label for="password_confirm">Password Confirmation</label>
<input id="password_confirm" type="password" name="password_confirm" value="" autocomplete="off"/>
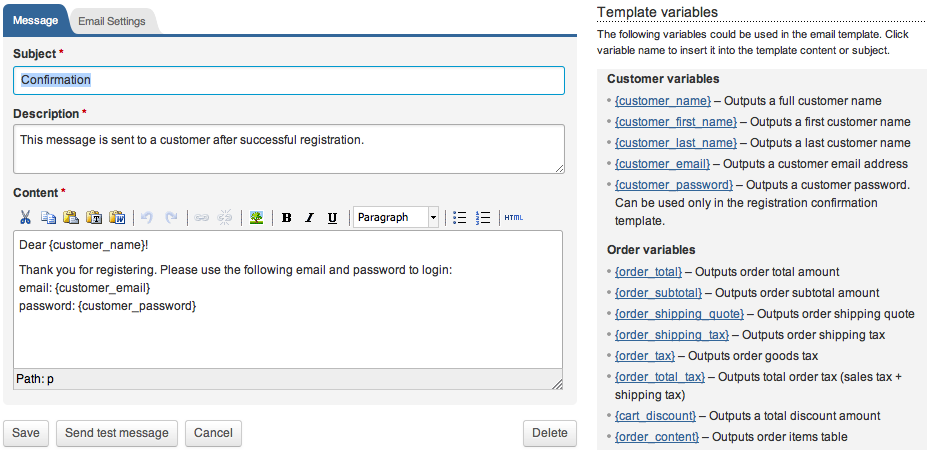
Customizing the registration confirmation message
You can customize the text of the default LemonStand customer registration confirmation message. Go to the Settings/Email Templates page and click the shop:registration_confirmation message template.
Automatic assigning a specific customer group to new customers
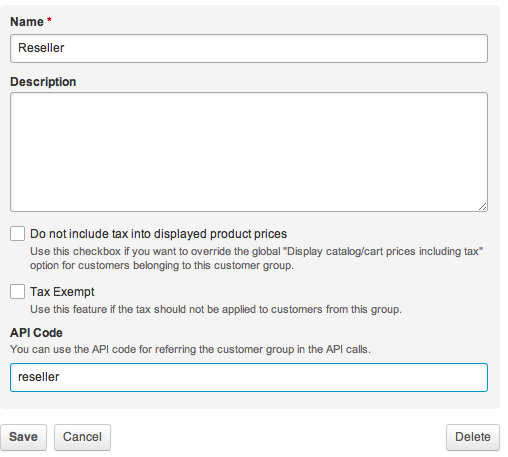
By default LemonStand assigns the "Registered" group for all customers who registers in a store. It is possible to ask a customer to specify a customer group he (she) belongs to. To implement this feature you first need to create customer groups on the Shop/Customers/Manage customer groups page. For each customer group you are going to allow customers to select during the registration, you need to specify the API Code.
After creating the customer groups, you need to add the drop-down menu control in the Registration page. To populate the drop-down menu, use the list_groups_by_codes method of the Shop_CustomerGroup class. The single parameter of this method is an array which should contain a list of API codes of customer groups you want to be displayed in the drop-down menu. The code example:
<label for="customer_group">Customer type</label>
<? $groups = Shop_CustomerGroup::list_groups_by_codes(array('registered', 'reseller')); ?>
<select id="customer_group" name="customer_group_id">
<? foreach ($groups as $group): ?>
<option value="<?= $group->id ?>"><?= $group->name ?></option>
<? endforeach ?>
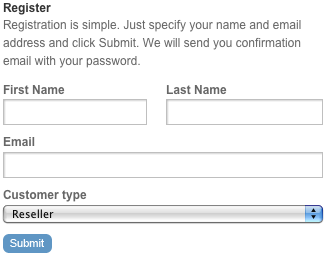
</select><label for="customer_group">Customer type</label>
{% set groups = method('Shop_CustomerGroup', 'list_groups_by_codes', ['registered', 'reseller']) %}
<select id="customer_group" name="customer_group_id">
{% for group in groups %}
<option value="{{ group.id }}">{{ group.name }}</option>
{% endfor %}
</select>Please note that the drop-down SELECT element should have the customer_group_id name. Below is an image of the registration form with a customer group selector.
Automatic customer login
You can enable the automatic customer login feature by adding the customer_auto_login hidden field to the registration form. Example:
<input type="hidden" name="customer_auto_login" value="1"/>
Next: Creating a Customer Account Password Restore Page
Previous: Enabling Customer Login and Logout
Return to Customer Accounts and Registration