LemonStand Version 1 Has Been Discontinued
This documentation is for LemonStand Version 1. LemonStand is now offered as a cloud-based eCommerce platform.
You can try the new LemonStand and learn about upgrading here.
Managing tax classes
Each product in LemonStand had a tax class assigned. Tax class is a set of rules which LemonStand uses to calculate tax amounts for a specific product. Using tax classes you can define tax rates for a specific location - country, state, or if it is needed - for a specific ZIP code or city. There is a special pre-defined Shipping tax class which is applied to a shipping service. You can edit this tax class, but you can not delete it.
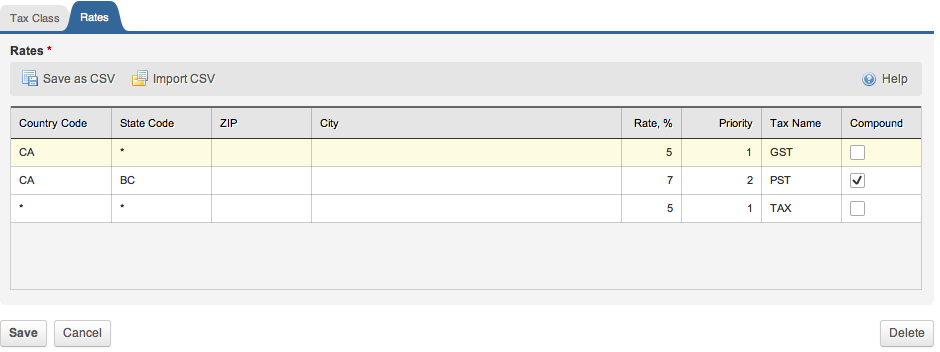
You can manage tax classes on the Shop/Tax Classes page. Click a tax class you want to edit, or create a new tax class. The Name and Rates fields are required. On the Rates tab you can define taxes for different locations using the following columns:
- Country Code - code of a country a tax is active for. You can specify a valid country code, or enter the * (asterisk) symbol for "any country" condition.
- State Code - code of a country state a tax is active for. A value should be a valid state code for a country specified in the first column. Also you can specify the * (asterisk) symbol for "any state" condition. The Country Code and State Code columns support the auto-complete feature. You can click a cell in these columns, or press alt+down to view a list of available values.
- ZIP - ZIP code a tax is active for. You can leave this field empty if you want a tax to be active for any ZIP code within the specified country and state.
- City - name of a city a tax is active for. You can leave this field empty if you want a tax to be active for any city the specified country and state.
- Rate - tax rate, as a percentage. To calculate a real tax amount, LemonStand uses the following equation: tax amount = subtotal * tax_rate/100.
- Priority - tax class priority. This column allows to apply up to 2 taxes to a same location. If you do not need to have multiple taxes, specify 1 for all rows in this column. Please read the Managing multiple taxes section below.
- Tax name - tax name, for example GST, or VAT. Do not use a same tax name for different taxes. Please remember that you should specify valid tax names in the Tax Name column.
- Compound - indicates that a tax should be compound (stacked). Please read the Managing multiple taxes section below.
The grid control on the Rates tab supports row sorting. You can drag any row up and down with a mouse. Also it supports the following hot keys:
- ctrl + i - insert a row
- ctrl + d - delete a row
- arrow keys - navigate between adjacent cells
How LemonStand determines which taxes to apply
When LemonStand calculates taxes for an order item (product), it first finds a tax class, corresponding the product. When it scans tax rates, which you have specified for the tax class, from the top downward, comparing a customer shipping location with locations specified in each row in the Rates grid. As soon as LemonStand finds a location match, it stops scanning the grid and calculates the tax amount using the Rate value specified in the Rate column.
When you define taxes, you should specify more specific tax locations (state- or ZIP-specific taxes) first, and general locations (country-wide taxes) after.
For example, imagine that you want to apply a 5% tax rate to all countries, and 6% tax to Canada. You can create the following tax configuration:

Note that the tax for Canada is defined before the general tax. If you place the general tax to the top, LemonStand will always use it, for any location, because the location condition for this tax is "Any country, any state". As we need a specific tax to be applied to Canada, we should place it before the general tax. Thus LemonStand will first check whether a customer is from Canada, and if so, will apply the 6% tax. In the same way, if you need to apply a specific tax to a specific country state, you need to define this tax before a country-wide tax.
Next: How to Manage Multiple Tax Classes
Previous: Creating custom product groups
Return to Merchant Guide