LemonStand Version 1 Has Been Discontinued
This documentation is for LemonStand Version 1. LemonStand is now offered as a cloud-based eCommerce platform.
You can try the new LemonStand and learn about upgrading here.
Forms
LemonStand programming framework includes the Db_FormBehavior class, which allows to add form features to controllers with ease. In this article we will continue extending the simple blog module, which we started in the Developing a simple module article. Now we will build pages for managing blog posts.
Declaring form fields in the model class
The form behavior builds forms automatically. But it requires a little help from our side. Specifically, we need to define which fields a form should contain. The Db_ActiveRecord class has the define_form_fields() method which should be used for defining for fields. Inside this method we will call the add_form_field() method for each field we want to add to the form.
All fields which should be presented on a form, must be defined in the define_columns() method, which we described in the Lists article. In the Lists article we defined 4 columns in the blog posts model class (AbcBlog_Post): id, title, description and categories. The blog post table also contains the content field. We need to display this field on the form, but we do not want it to be visible in the post list. We can achieve this by defining the column in the define_columns() method and marking it as invisible:
$this->define_column('content', 'Content')->invisible();Now we will define form fields corresponding to title, description and categories columns, using the define_form_fields() method. Below is a full code of the AbcBlog_Post class after adding the define_form_fields() method:
<?
  class AbcBlog_Post extends Db_ActiveRecord
  {
    public $table_name = 'abcblog_posts';

    public $implement = 'Db_AutoFootprints';
    public $auto_footprints_visible = true;

    public $has_and_belongs_to_many = array(
      'categories'=>array('class_name'=>'AbcBlog_Category', 'join_table'=>'abcblog_posts_categories', 'primary_key'=>'post_id', 'foreign_key'=>'category_id')
    );

    public function define_columns($context = null)
    {
      $this->define_column('id', '#');
      $this->define_column('title', 'Title');
      $this->define_column('description', 'Description');

      $this->define_multi_relation_column('categories', 'categories', 'Categories', "@name");
      $this->define_column('content', 'Content')->invisible();
    }

    public function define_form_fields($context = null)
    {
      $this->add_form_field('title');
      $this->add_form_field('description');
      $this->add_form_field('categories');
      $this->add_form_field('content');
    }
  }
?>
The order you call the add_form_field() mehtod for different fields is important, because fields will be placed to the form in the same order. The method has 2 parameters - a column name and a form side you want a field to be placed on. The default value of the second parameter is "full" which means that a field will be form-wide. Other possible values are left and right. You can place form fields side by side using the left and right position specifiers.
Before we continue, let's create a number of blog posts and categories, to make the testing process more interesting. Execute the following SQL queries in your LemonStand database:
insert into abcblog_posts(title, description, content, created_user_id, created_at)
  values ('First post', 'This is a first post', '<p>This is a first post. Yay!</p>', 1, NOW());
insert into abcblog_posts(title, description, content, created_user_id, created_at)
  values ('Second post', 'This is a second post', '<p>This is a second post!</p>', 1, NOW());
insert into abcblog_categories(name) values ('First category');
insert into abcblog_categories(name) values ('Second category');
Extending the posts controller
Now we need to update the posts controller. In the List filters article we already added the Db_FormBehavior to the list of the posts controller behaviors:
class AbcBlog_Posts extends Backend_Controller
{
  public $implement = 'Db_ListBehavior, Db_FilterBehavior, Db_FormBehavior';
  ...
If you missed this step, you need to add the form behavior now. As any other behavior, the form behavior has a number of configuration parameters. Most of them are optional, but there are two required options: $form_model_class and $form_redirect. These options must me added to the controller class as public class fields:
public $form_model_class = 'AbcBlog_Post';
public $form_redirect = null;
The $form_redirect parameter tells the form behavior where the browser should be redirected when a user clicks the Save, Cancel or Delete button. In our case we need to assign an URL of the blog post list page to this field. But as we explained in the Lists article, URS of the Administration Area pages are not static, and we need to use the url() function in order to obtain an actual URL of our blog post list. That is why we defined the field with NULL value. We need to use the posts controller class constructor to assign an actual value to the field:
public function __construct()
{
  ...
  $this->form_redirect = url('/abcblog/posts');
  ...
}
This controller configuration is sufficient, but we would like to show you 3 more useful form behavior options, which we use in all controllers:
public $form_create_title = 'New Post';
public $form_edit_title = 'Edit Post';
public $form_not_found_message = 'Post not found';
These fields specify titles for the Create and Edit pages. And the last field sets an error message which should be displayed when a user tries to edit a non existing blog post.
Creating views for the Create Posts and Edit Post pages
Now we need to create view documents for our Create and Edit Post pages.
The form behavior adds the edit, preview and create actions to controllers automatically. You don't need to develop these actions. But you need to provide view documents for them.
Let's start from the Edit Post view document. Create it in the modules/abcblog/controllers/abcblog_posts directory. The document name should be edit.htm. Below is a code of the view document. It contains breadcrumbs, a correct error handling code, the form and 3 buttons:
<? Phpr_View::beginBlock("view") ?>
  <ul class="breadcrumbs">
    <li><a href="<?= url('/abcblog/posts') ?>">Blog Posts</a></li>
    <li><?= $this->app_page_title ?></li>
  </ul>

  <?= flash() ?>

  <? if (!isset($fatalError)): ?>
    <div class="form600">
      <?= Phpr_Form::openTag(array('id'=>'form_element')) ?>
        <? $this->formRender() ?>

        <?= backend_ajax_button('Save', 'edit_onSave', array('class'=>'default')) ?>
        <?= backend_ajax_button('Cancel', 'edit_onCancel') ?>

        <?= backend_ajax_button('Delete', 'edit_onDelete', array('class'=>"right"), "confirm: 'Do you really want to delete this post?'") ?>
        <div class="clear"></div>
      </form>
    </div>
  <? else: ?>
    <p><a href="<?= url('/abcblog/posts') ?>">Return to the post list</a></p>
  <? endif ?>
<? Phpr_View::endBlock() ?>
The most interesting thing in the code is the formRender() method call. This method is added to the controller by the form behavior. It outputs the form HTML markup. Also the code contains 3 AJAX buttons, which refer to the edit_onSave, edit_onCancel and edit_onDelete AJAX event handlers.
The form behavior adds the edit_onSave, edit_onCancel, edit_onDelete, create_onSave and create_onCancel event handlers to controllers automatically and you do not need to define them manually.
Now, if you click any record in the post list, you will see the Edit Post page:
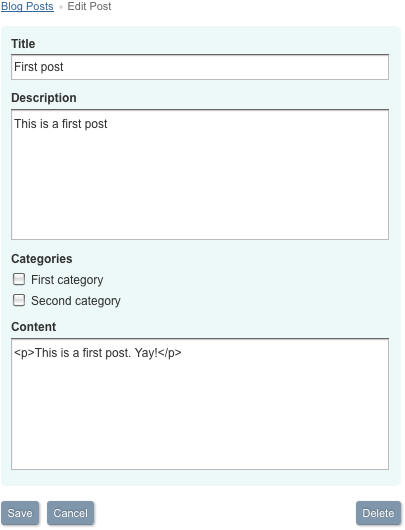
The form behavior created a correct form for us. As you can see it used the column database types for determining which control is best suitable for different columns. The Title column, which is defined as varchar field in the database, is presented with a single-line input element. The Description and Content fields, which are defined as text fields, are presented with the text area form elements. If there was a column with type tinyint, it would be rendered as a checkbox.
Using the validation
Some fields of a blog post must be required. Let's extend our post model by marking the Title and Categories fields as required. Also we will limit the minimum length of the title field with 4 characters. To do it we need to define validation rules for the Title and Categories fields. You can do it in the define_columns() method of the model class. The define_column() method returns an instance of the Db_ColumnDefinition class. This class has the validation() method, which returns the Phpr_ValidationRules object. This class has multiple fields for managing different validation parameters. This is the updated column definition code:
public function define_columns($context = null)
{
  ...
  $this->define_column('title', 'Title')->validation()->fn('trim')->
    required('Please specify a blog post title')->
    minLength(4, 'The post title should be at least 4 characters in length');

  $this->define_multi_relation_column('categories', 'categories', 'Categories', "@name")->
    validation()->required('Please select at least one category');
  ...
}
In the code we used 3 methods of the Phpr_ValidationRules class returned by the validation() method:
- fn() - executes a PHP function specified in the argument, using the field value as input. In our case we used the trim() function, which removes trailing and leading spaces from a string. This is a good practice to use the trim() function for all string-typed form fields.
- required() - indicates that a field is required. The optional parameter allows to specify a custom error message.
- minLength() - allows to set minimum length of a field value. The method has 2 parameters - a minimum field length, and an optional custom error message.
The form behavior automatically marks required fields with the red asterisk symbol. Here is our updated blog post form, displaying an error message on the Title field:
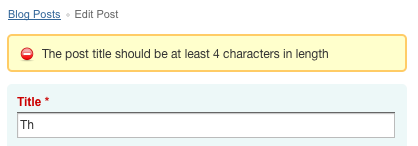
You can find more information about the form validation in the API section.
Adding form tabs and using field render modes
We can improve the post form appearance by adding form tabs. When you call the add_form_field() method in the define_form_fields() model method, it returns an instance of the Db_FormFieldDefinition class. This class has methods which manage how a field will be presented on the form. Among others it has the tab() method, which places a field to a specific tab. Let's add tabs to the post form by calling the tab() for all form fields:
public function define_form_fields($context = null)
{
  $this->add_form_field('title')->tab('General parameters');
  $this->add_form_field('description')->tab('General parameters');
  $this->add_form_field('categories')->tab('General parameters');
  $this->add_form_field('content')->tab('Content');
}
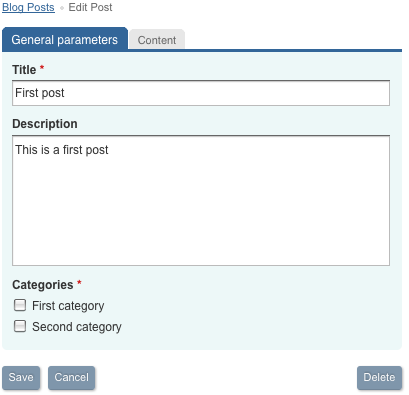
The code creates 2 tabs - General parameters and Content:
And finally let's make the post editing process more comfortable by adding the full featured HTML editor to the Content field. We can achieve it by setting a field render mode for the content field. The renderAs() method of the Db_FormFieldDefinition class allows to set a specific form rendering mode for any field:
$this->add_form_field('content')->tab('Content')->renderAs(frm_html);The frm_html constant is defined in the Active Record engine. It indicates that a field should be rendered as an HTML editor. You can find more information about possible render modes in the Db_FormFieldDefinition class description.
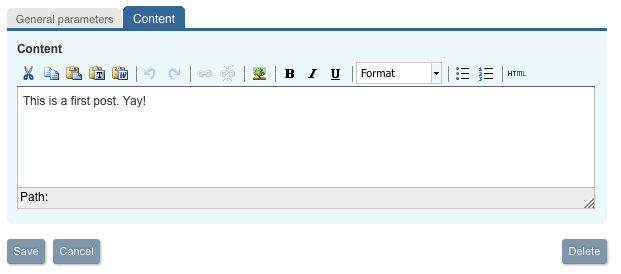
If you update the Edit Post page now and click the Content tab you will see that the Content field now contains the HTML editor:
The HTML editor requires one extra action. Before we save the form, we need the HTML editor (TinyMCE) to save its content to the Content text area. To do it we need to update the Save button definition in the edit.htm file:
<?= backend_ajax_button('Save', 'edit_onSave', array('class'=>'default'), "prepareFunction: function(){phprTriggerSave();}") ?>The fourth parameter of the AJAX button function allows to set parameters for the AJAX request triggered by the button. The phprTriggerSave() function is defined in the LemonStand forms engine and it prepares HTML fields for sending data to the server. You need to use this approach for all forms which contain HTML forms.
Adding the Create Post button and the Create Post page
The last thing we need to add is the Create Post button on the post list page, and the Create Post page. To add the Create Post button, add the following code to the index.htm document, above the listRender() function call:
<div class="list_controlPanel">
  <?= backend_button('Create post', url('/abcblog/posts/create')) ?>
  <div class="clear"></div>
</div>
The backend_button() and the control panel elements are described in the Standard page elements article. The final view of the post lists page:
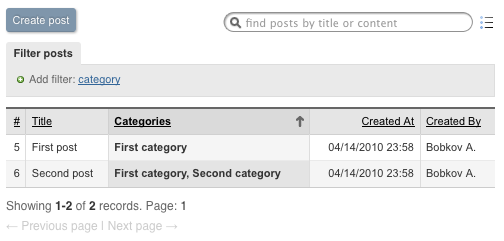
The button in our example is a regular link which points to the create action of our posts controller. The action itself is added by the form behavior, but we need to create a corresponding view document. Its name should be create.htm and it should be placed to the modules/abcblog/controllers/abcblog_posts directory. Here is a full code of the view file:
<? Phpr_View::beginBlock("view") ?>
  <ul class="breadcrumbs">
    <li><a href="<?= url('/abcblog/posts') ?>">Blog Posts</a></li>
    <li><?= $this->app_page_title ?></li>
  </ul>

  <?= flash() ?>

  <? if (!isset($fatalError)): ?>
    <div class="form600">
      <?= Phpr_Form::openTag(array('id'=>'form_element')) ?>
        <? $this->formRender() ?>

        <?= backend_ajax_button('Save', 'create_onSave',  array('class'=>'default'),
            "prepareFunction: function(){phprTriggerSave();}") ?>

        <?= backend_ajax_button('Cancel', 'create_onCancel') ?>
        <div class="clear"></div>
      </form>
    </div>
  <? else: ?>
    <p><a href="<?= url('/abcblog/posts') ?>">Return to the post list</a></p>
  <? endif ?>
<? Phpr_View::endBlock() ?>
Please note that the Create Post page does not have the Delete button. And the Save and Cancel AJAX buttons point to the create_onSave and create_onCancel AJAX handlers.
Conclusion
In this article we demonstrated the power of the LemonStand forms engine, which can create rich forms almost without any coding from your side. In the further articles we will show how you can create actions for extending the front-end website with new features.
You can download the updated module here.
Previous: List Filters
Return to Lists and Forms in the Administration Area