LemonStand Version 1 Has Been Discontinued
This documentation is for LemonStand Version 1. LemonStand is now offered as a cloud-based eCommerce platform.
You can try the new LemonStand and learn about upgrading here.
Adding a Back-End User Interface
In this section we will explain how you can add new items to the LemonStand Administration Area main menu, new tabs to the top menu, and new pages. Also we will describe the process of creating forms and lists. You will see that LemonStand API does almost all the work for you and you can accomplish most of the tasks with only a few lines of code.
Controllers and Views
LemonStand Administration Area implements the well known MVC programming pattern. MVC stands for Model View Controller. You already familiar with models, which were described in the Working with the database article. Other two letters in MVC are views and controllers and they are responsible for displaying pages in the Administration Area.
The Controllers and Views approach allows to separate a page background logic and the page visual representation. Controllers are PHP classes which can prepare all required data before a page is displayed. Views are HTML files which format and display the prepared data to a user. You can find more information about views in the Structure of a view document article.
Controllers are PHP classes which should be defined inside file placed to the module controllers directory. Usually each controller handles a single data object. For example, in the Shop module we have separate controllers for managing orders, customers and products. This separation not only simplifies controllers code, but also allows to leverage the power of LemonStand behaviors which automate such tasks as creating lists and forms in the Administration Area.
All controllers should extend the Backend_Controller class. Also, there is a simple naming convention, the same as used for all module class names (please see the Developing LemonStand modules article for details), which says that the controller class names should start from the module identifier. All controllers of the Shop module have names starting with "Shop_" prefix. The remaining part of the name can be anything and affects the URL of pages represented by the controller.
For example, if there is a Shop_Customers controller class, all pages supplied by this controller in the Administration Area will have the /shop/customers URL prefix.
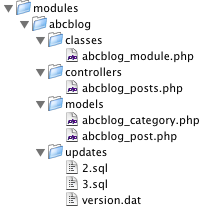
In this article we will continue building the blog module, which we started in the Developing a simple module article. Let's start with implementing a controller for managing the blog posts. We should create a controller class and place it to the abcblog/controllers directory. A suitable name for the controller is AbcBlog_Posts. A corresponding PHP script should have the abcblog_posts.php name. This is the blog module file structure after adding the controller script:
Also we should declare the AbcBlog_Posts class in the abcblog_posts.php script:
<?
  class AbcBlog_Posts extends Backend_Controller
  {
  }
?>
This is a correct controller declaration, but it is useless, because the controller does not supply any pages.
Each controller can provide any number of pages. For example to the Shop_Customers controller supplies the following pages: /shop/customers (the customer list), shop/customers/edit (the Edit Customer form), shop/customers/create (the Create Customer form), shop/customers/preview (the Preview Customer page) and some others.
Each page is represented by an action in the controller class. Action is a public class method, which name corresponds the page url. There is one exception - the index() action corresponds the controller root URL. Definition of the index action:
<?
  class AbcBlog_Posts extends Backend_Controller
  {
    public function index()
    {

    }
  }
?>
This code creates a page in the Administration Area. A prefix of the page URL depends on the Administration Area key URL, which you specified during the LemonStand installation. The page URL could be backdoor/abcblog/posts/ or admin/abcblog/posts/ - you should know its exact location. If you open the URL now, you will see an empty Administration Area page.
In the rest of the documentation we will use URLs relative to the Administration Area root URL: abcblog/posts/ instead of backdoor/abcblog/posts/
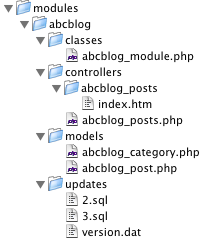
As we described earlier, we need a view file in order to display pages for each controller action. Views are HTML files which name and location depends on the controller and action name. In our case the controller name is AbcBlog_Posts and the action name is index. To create a view file for the index action, we need to create the abcblog_posts directory in the module controllers directory. After that we should create the index.htm file in the new directory. Here is the module file structure after adding the index action file:
Let's add something to the index.htm file, for the demonstration purposes:
<p>Hello, World!</p>
If you now update the posts URL, you will see the following page:
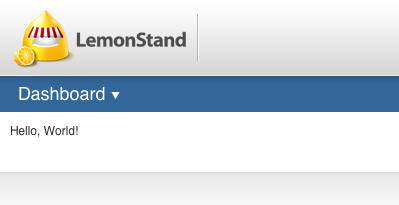
It means that the controller and view files work and you are ready to continue extending the Administration Area.
Setting the module and page titles
The page which we just created does not output any title in the Administration Area header. We can fix it by adding a couple of lines in the action definition code:
public function index()
{
  $this->app_module_name = 'Blog';
  $this->app_page_title = 'Posts';
}
Now the header area contains the module and page name:

Page parameters
It is often needed to pass parameters to Administration Area pages. When you want to edit a blog post, you need to specify which blog post you want to edit - in other words you need to specify the blog post identifier. It is easy to do by passing parameters through page URLs. For example, if you have the edit action in the blog posts controller, its URL would be /abcblog/posts/edit. To pass a blog post identifier you can add an extra segment to the end of the URL: /abcblog/posts/edit/4. The LemonStand MVC implementation passes parameters to actions through the action method parameters. For example, we can define the edit action in our blog posts controller, and this action could have the $id parameter:
public function edit($id)
{
  echo $id;
}
If you open the abcblog/posts/edit/1/ action you will see the 1 symbol in the left top corner of the page. You can define and pass as many page parameters as you need.
There is a tracing engine built into LemonStand, which allows to avoid using the echo function for displaying debug information. Use the traceLog($id); call in the previous code example, and look to the /logs/info.txt file for trace data.
Passing parameters from actions to views
Actions are designed for preparing data which will be accessed and displayed using view files. Thus, there should be a way to pass information from actions to views. This way is the viewData controller field. This field is an array-type variable. All elements which you create in this field in the action code become PHP variables in the view document. For example, let's imagine that the need to display a number of blog posts in the database in the blog posts page. We can extend the index function with a simple code (for simplicity we will use a static number value):
public function index()
{
  $this->app_module_name = 'Blog';
  $this->app_page_title = 'Posts';

  $this->viewData['post_number'] = 10;
}
We can now output the post number in the index.htm file:
<p>Number of posts in the database: <?= $post_number ?> </p>
If you refresh the abcblog/posts page you will see the following message: "Number of posts in the database: 10".
Administration Area URLs
LemonStand API has a special function url() which helps to generate URLs relative to Administration Area root URL. It allows you to display links to your Administration Area pages, which will work work any Administration Area URL key, on any LemonStand installation. For example, we can use this function for displaying a link to the Dashboard, which Administration Area-relative URL is /backend:
<p>Return to the <a href="<?= url('/backend') ?>">Dashboard</a></p>Continue
- Structure of a View Document - explains the internal structure of a view document
- Partials - explains how you can re-use common page elements using the partials concept
- Standard Page Elements - describes the standard Administration Area page elements like breadcrumbs, toolbars, indicators and buttons
- Handling Errors and Displaying Status Messages - explains how you can throw exceptions and display error and success messages on the pages
- Extending the Administration Area menu - explains how you can add new items to the main menu and new tabs to the top menu in the Administration Area
- Using AJAX - describes how you can use AJAX in the Administration Area
- Lists and Forms in the Administration Area - describes the process of implementing lists and forms
- Lists - describes the process of implementing lists in the Administration Area
- List Filters - explains how you can add the filtering feature to a list
- Forms - explains how you can create forms for adding, modifying and deleting database records
- Working with Checkboxes and Drop-Down Menus - explains how to work with customized controls in LemonStand Administration Area.
Next: Structure of a View Document
Previous: Administrative Dashboard
Return to Administrative Dashboard