LemonStand Version 1 Has Been Discontinued
This documentation is for LemonStand Version 1. LemonStand is now offered as a cloud-based eCommerce platform.
You can try the new LemonStand and learn about upgrading here.
Guide for Developing a Payment Module
LemonStand payment modules are classes defined in PHP scripts located in the payment_types directory of a LemonStand module. Technically payment module classes can belong to the Shop module or to any other custom module which you develop. You can develop your own payment module classes in order to provide LemonStand integration with specific payment gateways. Any LemonStand module can host any number of payment modules. Before you begin developing a new payment module you should choose whether you want to develop it as a Shop module class, or as a class of a separate custom module. You can choose the first option if you are developing a new payment module for a private use. The last option will allow you to share the module through the LemonStand marketplace.
Structure of a payment module
Payment module classes should extend the Shop_PaymentType class. This abstract PHP class contains all methods sufficient for developing any payment module. By overriding methods of this base class you can add specific features to your payment module.
There is a naming convention, which allows LemonStand to load payment module classes automatically. Payment module class names should have the following structure: ModuleCode_PaymentModuleName_Payment. The ModuleCode_ prefix and the _Payment suffix are required. Between the prefix and suffix you use any suitable name, describing the payment module. For example, in this article we will demonstrate the process of developing a payment module for the Beanstream payment gateway. This gateway has two integration options - the basic HTTP method and the advanced method, also called the server-to-server method. A suitable class name for the Beanstream basic integration method is Shop_Beanstream_Basic_Payment, if you are going to host it in the Shop module, or MyModule_Beanstream_Basic_Payment, if you are going to host it in your custom module with the MyModule code.
Each payment module class should be defined in a separate file, with the name matching the class name it contains, written in lower case. If the class name was the Shop_Beanstream_Basic_Payment, a corresponding file name, would be shop_beanstream_basic_payment.php.
Aside from the payment module PHP file, payment modules can also have a directory, with name matching the module PHP file name. The directory should be located in the same directory with the module PHP file, i.e. in the modules/shop/payment_types directory, in case if the payment module belongs to the Shop module, or modules/mymodule/payment_types, in case if the module belongs to a custom module with the MyModule code. If a payment module class name is shop_beanstream_basic_payment.php, than the corresponding module directory name is shop_beanstream_basic_payment. Module directories can contain HTML and XML files required for the module. Below is a screenshot of the modules/shop/payment_types directory. On the screenshot you can see some payment module PHP files and corresponding directories.

Types of the payment gateway integration
There are two generic types of payment integration methods. The redirection method implies a payment form located on the payment gateway server. When a customer clicks the Pay button on your store, he is redirected away from the store to the secure payment form hosted on the payment gateway server. PayPal Standard and Authorize.Net Simple Integration Method are examples of the redirection integration approach.
With another integration method, which is sometimes called the server-to-server integration method, the payment form is located on your own server. When a customer clicks the Pay button, the payment module sends a request to the payment gateway in background, and then displays the transaction registration result to the customer. Customers do not leave your website, and the method provides more consistent user experience. PayPal Pro and Authorize.net Advanced Integration Method are examples of the server-to-server integration.
You can implement both integration methods with LemonStand payment modules. Actually, most of the existing LemonStand payment modules have two versions, corresponding the redirection and server-to-server integration. If you are going to implement both integration methods for a single payment gateway, you will need to develop two different classes. For example, for the Beanstream payment gateway there are two payment module classes: Shop_Beanstream_Basic_Payment and Shop_Beanstream_ServerToServer_Payment.
You can find the Beanstream payment modules which we refer in this article in the following files:
- /modules/shop/payment_types/shop_beanstream_basic_payment.php - Beanstram basic (redirection) integration method.
- /modules/shop/payment_types/shop_beanstream_servertoserver_payment.php - Beanstram server-to-server integration method.
Common payment module functions
Regardless of what specific integration type (redirection or server-to-server) a payment module implements, there is a number of common function each payment module should provide. Firstly, each module should provide the information about itself - the payment gateway name, and payment module description. Also each module should have a configuration form, which LemonStand administrators will use for creating a payment option and setting module-specific parameters. All required payment module functions should be implemented as class methods, which we are describing below.
Defining a payment module class
Below is a partial declaration of the payment module class, which implements the Beansream Basic integration. The code defines the class and a method which returns the module specific information.
<?
class Shop_Beanstream_Basic_Payment extends Shop_PaymentType
{
public function get_info()
{
return array(
'name'=>'Beanstream Basic Integration',
'description'=>'A basic HTTP POST integration. The customer’s browser will be pointed to the Beanstream server at the time of processing.'
);
}
}
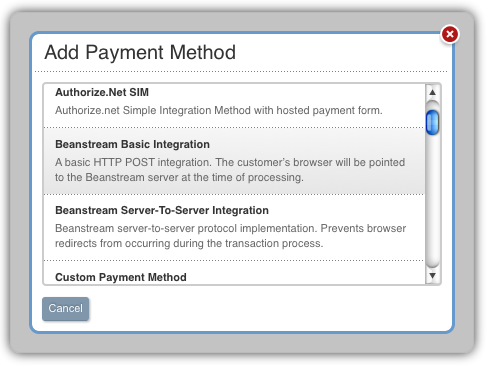
?>The get_info() method should be declared in all payment modules. The method should return an array containing the module name and description. This information will be presented in the Add Payment Method form in the Administration Area:
The resulting array can also contain elements specific for the redirection and server-to-server integration methods. We will explain the possible array elements in corresponding articles.
Building the payment module configuration form
Another required payment module class method is the build_config_ui(). This method builds the module configuration form and it is similar to the define_form_fields() method of the model class, which we described in the Forms article. In this method you can add tabs and fields to the module configuration form. All field values are saved automatically and you can access them inside the payment processing code. In this method you should add only module-specific fields, for example fields for API user name and password. All fields which are common for all payment modules, for example payment method name, description and checkboxes for selecting countries the method is applicable for, are added by LemonStand automatically. The set of fields depends on specific payment gateway and you need to refer to your payment gateway API description in order to find out which configuration fields you need to create on the configuration form.
Below is a definition of the build_config_ui() method of the Beanstream Basic Integration payment module.
public function build_config_ui($host_obj, $context = null)
{
  if ($context !== 'preview')
  {
    $host_obj->add_field('merchant_id', 'Merchant ID')->tab('Configuration')->renderAs(frm_text)->
      comment('Include the 9-digit Beanstream ID number here.', 'above')->validation()->fn('trim')->
      required('Please provide Merchant ID.');
  }

  $host_obj->add_field('transaction_type', 'Transaction Type')->tab('Configuration')->renderAs(frm_dropdown)->
    comment('The type of credit card transaction you want to perform.', 'above');

  $host_obj->add_field('order_status', 'Order Status')->tab('Configuration')->renderAs(frm_dropdown)->
    comment('Select status to assign the order in case of successful payment.', 'above', true);
}
The method receives 2 parameters - the Active Record object, which should be used for adding form fields, and a form context. If the form context value is preview, the method should not create any form fields which contain API user names or passwords, because the payment gateway preview form is available in read-only mode from the Order Preview page. The condition in the beginning of the example code excludes the Merchant ID field from the Preview form. For example, below is the preview form of the PayPal Standard payment module, which LemonStand administrators can access from the Shop/Orders/Order Preview page.

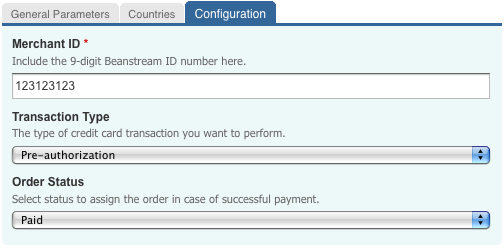
The example code creates 3 fields on the configuration form - Merchant ID, Transaction Type and Order Status. The Merchant Id field is a gateway-specific field, which is required in order to register a transaction on the Beanstream payment gateway. The Transaction Type field is also a gateway-specific field. It allows to choose a specific operation to be applied to a credit card. Many payment gateways allow to specify a transaction type in the transaction registration request. The Order Status field allows to select a status the order should be sent after successful transaction registration. With rare exception you will need to create this form field on all payment module forms. Below is a screenshot of the Configuration tab of the module configuration form:
To add fields to the configuration form, the code inside the build_config_ui() method should call the add_field() method of the object, passed in the first method parameter. This method has two parameters - the field identifier and the field title. Field identifiers should be compatible with PHP variable names - they should not contain spaces, and they can contain only Latin characters and numbers. Using the optional third parameter you can specify a field placement on the form. Allowed parameter values are left, right and full (it is a default value).
The add_field() method returns an object of the Db_FormFieldDefinition class, which you can use for configuring a field appearance and validation rules. The renderAs() method allows to specify a preferable control type for a field. You can find a list of possible control types in the Db_FormFieldDefinition class description.
The code above sets the drop-down control type for the order_status and transaction_type form fields. For each drop-down field there has to be defined a method returning a list of options. The method name should have the following structure: get_field_name_options. Thus, for the order_status and transaction_type valid method names are get_order_status_options and get_transaction_type_options. The methods should have a single parameter with default value -1. Below is an example of the both methods:
public function get_transaction_type_options($current_key_value = -1)
{
  $options = array(
    'PA'=>'Pre-authorization',
    'P'=>'Purchase'
  );

  if ($current_key_value == -1)
    return $options;

  return isset($options[$current_key_value]) ? $options[$current_key_value] : null;
}

public function get_order_status_options($current_key_value = -1)
{
  if ($current_key_value == -1)
    return Shop_OrderStatus::create()->order('name')->find_all()->as_array('name', 'id');

  return Shop_OrderStatus::create()->find($current_key_value)->name;
}
The methods return arrays of available options as associative arrays with indexes matching option identifiers and values matching option titles. For example, the get_transaction_type_options() method, which returns a list of options for the Transaction Type field, returns the following array:
array(
  'PA'=>'Pre-authorization',
  'P'=>'Purchase'
);
The array key values (PA and P) correspond the Beanstream API documentation for possible transaction types. LemonStand renders this field as a drop-down menu with options corresponding the array elements:

Methods which return option lists, should check the method parameter value. If the parameter value is equal to -1, a method should return all possible options. If the parameter value is not -1, the method should try to find an option corresponding the parameter value, and return the option name (title). You can find conditions examining the $current_key_value parameter value in the code examples above.
Validating the configuration form data
All payment module classes should override the validate_config_on_save() method. Inside this method a module can check configuration field values before the configuration is saved to the database. The method has a single parameter - an object, with fields matching form fields defined in the build_config_ui() method. The method should be implemented even if you are not going to perform any parameter validation. In this case you can leave it empty. Below is a code example, which checks the merchant_id field:
public function validate_config_on_save($host_obj)
{
  if ($host_obj->merchant_id == 'some_false_value')
    $host_obj->field_error('merchant_id', 'Please specify a valid value in the Merchant Id field.');
}
Processing gateway response
Another method which must be implemented in all payment method classes is the process_payment_form(). This method is called by LemonStand when it receives a response from a payment gateway. We will describe the method implementation for the redirection and server-to-server integration types in the corresponding articles.
Initializing the configuration form field values
You can initialize values of the configuration form fields using the init_config_data() optional method. The values will be applied when a payment method based on your payment module is created. The method receives a single parameter, which you can use for setting values to fields defined in the build_config_ui() method. Example:
public function init_config_data($host_obj)
{
  $host_obj->merchant_id = '000000';
}
Disallowing an order status deletion
If your payment method configuration form has the Order Status field, you should disallow LemonStand administrators to delete an order status the payment method refers to, in order to keep the system integrity. The status_deletion_check() method is called by LemonStand each time when somebody tries to delete an order status on the System/Order Route page. You can implement the method in the following way:
public function status_deletion_check($host_obj, $status)
{
  if ($host_obj->order_status == $status->id)
    throw new Phpr_ApplicationException('This status cannot be deleted because it is used in the Beanstream Basic payment method.');
}
Payment form partial templates
Each payment gateway should provide template files for the payment form partial, containing a payment form which will be displayed on the front-end store. There should be two template files - for PHP and Twig templating engines. When LemonStand finds a new payment module, it creates a new partial from the template file. The partial name depends on a payment module name. For example, for the Beanstream Basic payment module, LemonStand creates a partial with the "payment:beanstream_basic" name. Store developers can modify payment partials for styling purposes.
The payment form partial is automatically rendered by LemonStand when the render_payment_form() method is called from the Pay page. The partial template files should have the front_end_partial.htm and front_end_partial.twig names and should be placed to the payment method directory, which we mentioned earlier in the Structure of a payment module section of this article.
Please note that LemonStand creates partials from template files only once, if it cannot find a payment partial for a specific payment method. LemonStand never updates contents of existing payment form partials, allowing LemonStand administrators to customize them. During the payment module development process, if you need to update a payment form partial content, you may need to delete the corresponding partial manually (on the CMS/Partials page), and then update the partial template file. Then LemonStand will re-create the partial from the template file as soon as you open the Pay page.
We will describe the template files content for redirection and server-to-server integration methods in the following articles:
Implementing the customer payment profiles support
If the payment gateway supports tokenization, you can implement the customer payment profile support your payment module. In order a payment module to support payment profiles, you should implement the following methods in the payment module class:
- public function supports_payment_profiles() - the method should return TRUE.
- public function update_customer_profile($host_obj, $customer, $data) - updates or creates a payment profile on the payment gateway and in LemonStand database.
- pay_from_profile($host_obj, $order, $back_end = false, $redirect = true) - pays an order from an existing payment profile.
- delete_customer_profile($host_obj, $customer, $profile) - deletes a payment profile from the payment gateway
if you are developing a server-to-server payment method, in the process_payment_form() method you should examine the create_customer_profile element in the input $data array, and if it is set - create (or update) a payment profile. Also you should create template files for the payment profile partial, containing the form for creating and updating the payment profile. The form should contain gateway-specific fields for entering the credit card details. The template files should be placed to the payment module directory. There should be two templates - for PHP and Twig templating engines. The template file names should be payment_profile_partial.htm and payment_profile_partial.twig. Below is a typical payment profile form partial content:
<p>Please provide your credit card information.</p>

<?= open_form() ?>
  <?= flash_message() ?>
  <label for="FIRSTNAME">Cardholder First Name</label>
  <input autocomplete="off" name="FIRSTNAME" value="" id="FIRSTNAME" type="text" class="text"/><br/>

  <label for="LASTNAME">Cardholder Last Name</label>
  <input autocomplete="off" name="LASTNAME" value="" id="LASTNAME" type="text" class="text"/><br/>

  <label for="ACCT">Credit Card Number</label>
  <input autocomplete="off" name="ACCT" value="" id="ACCT" type="text" class="text"/><br/>

  <label for="EXPDATE_MONTH">Expiration Date - Month</label>
  <select autocomplete="off" name="EXPDATE_MONTH" id="EXPDATE_MONTH">
    <? for ($month=1; $month <= 12; $month++): ?>
      <option value="<?= $month ?>"><?= $month ?></option>
    <? endfor ?>
  </select>

  <label for="EXPDATE_YEAR">Expiration Date - Year</label>
  <select autocomplete="off" name="EXPDATE_YEAR" id="EXPDATE_YEAR">
    <?
      $startYear = Phpr_DateTime::now()->getYear();
      for ($year=$startYear; $year <= $startYear + 10; $year++):
    ?>
      <option value="<?= $year ?>"><?= $year ?></option>
    <? endfor ?>
  </select><br/>

  <label for="CVV2">CVV2</label>
  <input autocomplete="off" name="CVV2" value="" id="CVV2" type="text"/><br/>

  <input type="button" onclick="return $(this).getForm().sendRequest('shop:on_updatePaymentProfile')" value="Submit"/>
</form>
<p>Please provide your credit card information.</p>
{{ open_form() }}
{{ flash_message() }}
<label for="FIRSTNAME">Cardholder First Name</label>
<input autocomplete="off" name="FIRSTNAME" value="" id="FIRSTNAME" type="text"/><br/>
<label for="LASTNAME">Cardholder Last Name</label>
<input autocomplete="off" name="LASTNAME" value="" id="LASTNAME" type="text"/><br/>
<label for="ACCT">Credit Card Number</label>
<input autocomplete="off" name="ACCT" value="" id="ACCT" type="text"/><br/>
<label for="EXPDATE_MONTH">Expiration Date - Month</label>
<select autocomplete="off" name="EXPDATE_MONTH" id="EXPDATE_MONTH">
{% for month in 1..12 %}
<option value="{{ month }}">{{ month }}</option>
{% endfor %}
</select>
<label for="EXPDATE_YEAR">Expiration Date - Year</label>
<select autocomplete="off" name="EXPDATE_YEAR" id="EXPDATE_YEAR">
{% set startYear = method('Phpr_DateTime', 'now').getYear() %}
{% for year in startYear..(startYear+10) %}
<option value="{{ year }}">{{ year }}</option>
{% endfor %}
</select>
<label for="CVV2">CVV2</label>
<input autocomplete="off" name="CVV2" value="" id="CVV2" type="text"/><br/>
<input type="button" onclick="return $(this).getForm().sendRequest('shop:on_updatePaymentProfile')" value="Submit"/>
</form>Implementation of the listed methods depends on a specific payment gateway API, but there are some parts common for all payment gateways.
Creating/updating a customer payment profile
In the update_customer_profile() you should define code for updating or creating a customer payment profile. Inside the method you first need to check whether a customer profile exists with the $host_obj->find_customer_profile($customer) call and then - update existing or create new profile. Below is a typical template of the update_customer_profile() method for a server-to-server payment module.
public function update_customer_profile($host_obj, $customer, $data)
{
  /*
   * Find the existing profile
   */

  $profile = $host_obj->find_customer_profile($customer);
  $new_profile_required = !$profile;

  /*
   * Validate input data - examine the $data array which contains values of the Create/Update Payment Profile form
   * (the payment_profile_partial.htm partial) and trow an exception if needed.
   */

  ...

  /*
   * Create or update the profile
   */

  if ($new_profile_required)
  {
    /*
     * Profile is not found or empty - create new profile using the payment gateway API
     */

    ...

    /*
     * Create new payment profile with the $host_obj->init_customer_profile() call and
     * set the profile data. Profile data is a gateway specific values, which you can
     * use in the subsequent operations with the payment profile.
     */

    $profile = $host_obj->init_customer_profile($customer);

    $profile_data = array(
      ... create payment gateway specific values here ...
    );

    /*
     * Save the profile data along with the last 4 digits of the credit card number.
     * The API will truncate the CC number even if you provide more than 4 digits.
     */

    $profile->set_profile_data($profile_data, '1234');
  } else
  {
    /*
     * Profile exists - update the profile on the gateway with the gateway API.
     */

    ...

    /*
     * Update the last 4 digits of the credit card stored in the profile
     */

    $profile->set_cc_num('1234');
  }

  return $profile;
}
Redirection payment methods usually process payment profiles on the gateway side and do not require implementing this method.
Paying from an existing profile
In the pay_from_profile() method you should define code for paying an order from an existing payment profile. The method should first check whether the payment profile exists for a specified customer, and then use the payment gateway API for paying the order from this profile. Below is a typical template of the pay_from_profile() method:
public function pay_from_profile($host_obj, $order, $back_end = false, $redirect = true)
{
  /*
   * Find customer profile and throw an exception if it doesn't exist
   */

  $profile = $host_obj->find_customer_profile($order->customer);
  if (!$profile)
    throw new Phpr_ApplicationException('Payment profile not found');

  try
  {
    /*
     * Use the payment gateway API to pay with an existing payment profile. Use gateway specific
     * information saved in the payment profile data array.
     */

    ...

    /*
     * Successful payment. Set order status and mark it as paid.
     */

    $this->log_payment_attempt($order, 'Successful payment', 1, $this->prepare_fields_log($request->getPostString()), $response_array, $response_text);

    /*
     * Change order status
     */

    Shop_OrderStatusLog::create_record($host_obj->order_status, $order);

    /*
     * Mark order as paid
     */
    $order->set_payment_processed();
  } catch (exception $ex)
  {
    /*
     * Log the error
     */

    $this->log_payment_attempt($order, $ex->getMessage(), 0, $this->prepare_fields_log($request->getPostString()), array(), null);

    throw new Phpr_ApplicationException($ex->getMessage());
  }
}
Deleting a payment profile
Inside the delete_customer_profile() your payment module should use the payment gateway API for deleting a module from the payment gateway. Deleting the profile from LemonStand database is not needed - LemonStand does it automatically. Module template:
public function delete_customer_profile($host_obj, $customer, $profile)
{
  /*
   * Use the payment gateway API to delete the profile from the gateway.
   * Use the gateway specific data stored in the profile data array.
   */

  $request = new PaymentGatewayRequest();
  $response = $request->deleteCustomerProfile($profile->profile_data['customer_profile_id']);
  if (!$response->isOk())
    throw new Phpr_ApplicationException('Error deleting customer payment profile. '.$response->getMessageText());
}
Next: Using a Redirection Integration Method
Previous: Handling LemonStand Events
Return to Extending LemonStand