LemonStand Version 1 Has Been Discontinued
This documentation is for LemonStand Version 1. LemonStand is now offered as a cloud-based eCommerce platform.
You can try the new LemonStand and learn about upgrading here.
Using a Server-to-Server Integration Method
This article continues the Developing payment modules article. Please read it before reading this article. Before implementing the server-to-server integration method, please make sure that your payment gateway supports it.
To begin implementing a new payment module for the server-to-server integration method, create a payment module class as it described in the Developing payment modules article. In this article we will show you which specific methods should be added to the module class.
Download payment module template
You can download two module archives:
- Payment module as a part of the Shop module - download it if you are not going to distribute the payment module via LemonStand Marketplace and going to use it only in your own store: server2server_payment_template.zip. The archive contains a module class file and a corresponding directory with partials required for the module. You can rename the module file, PHP class and the directory and begin implementing your own payment module, following the description in this article.
- Payment module as a part of a standalone LemonStand module - use it if you are going to distribute the module via LemonStand Marketplace: demopayment.zip. Please rename the module directory and classes to reflect your company name and avoid possible conflicts with other marketplace modules (read this article for details).
How server-to-server payment methods work
With the server-to-server payment method, the payment form is hosted on the store website. Customers enter all required payment information (credit card number, card expiration date and so on) in this form and then click the Pay button. The LemonStand payment module sends a request to the payment gateway and receives a response from it.
The payment module parses the payment gateway response and checks whether the transaction was successful. In this case the module updates the order status, marks the order as paid and logs the successful payment attempt. If the transaction has been declined by the payment gateway, the payment module triggers an error (throws an exception), which is displayed to the customer.
The main challenge in developing server-to-server payment modules is sending request to the payment gateway and parsing the response. Usually this process is documented in payment gateway integration guides.
Developing a payment form partial template
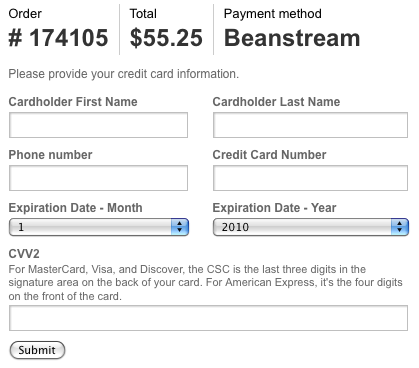
In the Developing payment modules article we explained that each payment module should have payment form partial template files for PHP and Twig templating engines (please see the Payment form partial templates section). For server-to-server payment modules, the payment form should contain input fields required by the payment gateway. You can find a list of required form fields in the integration guide of your payment gateway. Below is a screenshot of the Beanstream server-to-server module payment page:

The "Please provide your credit card information." label and form fields are defined in the payment partial files (front_end_partial.htm and front_end_partial.twig) of the Beanstream payment module. Below is an excerpt of this file:
<p>Please provide your credit card information.</p>

<?= open_form() ?>
  <?= flash_message() ?>
  <ul class="form">
    <li class="field text left">
      <label for="FIRSTNAME">Cardholder First Name</label>
      <div><input autocomplete="off" name="FIRSTNAME" value="" id="FIRSTNAME" type="text" class="text"/></div>
    </li>
    ....
  </ul>
  <div class="clear"></div>
  <input type="button" onclick="return $(this).getForm().sendRequest('shop:on_pay')" value="Submit"/>
</form>
<p>Please provide your credit card information.</p>
{{ open_form() }}
{{ flash_message() }}
<ul class="form">
<li class="field text left">
<label for="FIRSTNAME">Cardholder First Name</label>
<div><input autocomplete="off" name="FIRSTNAME" value="" id="FIRSTNAME" type="text" class="text"/></div>
</li>
...
</ul>
<div class="clear"></div>
<input type="button" onclick="return $(this).getForm().sendRequest('shop:on_pay')" value="Submit"/>
</form>Please note that we use the unordered list (UL) for presenting form fields. This is not a requirement of LemonStand, but this HTML markup is compatible with the LemonStand default store, which we distribute with the application installer. If you are going to share you payment module with other LemonStand users, please follow this HTML coding approach.
The code example above displays only a single form field. The input field element in the code example has the FIRSTNAME name. You can use other field names in your payment modules. In the payment module class you need to define the process_payment_form() method (we will describe it later), and inside this method you can access the payment form field values by their names, in order to format a payment gateway request string.
The FORM HTML element in the payment form partial is declared using the open_form() function. Inside the form the flash_message() function called for displaying an error message (if any). Finally, the button element triggers the AJAX request which invokes the shop:on_pay event handler. Please follow this technique in all payment forms you develop.
Sending a request to the payment gateway
When a customer clicks the Submit button on the payment form, LemonStand invokes the process_payment_form() method of a corresponding payment method class. This method is a heart of any server-to-server payment module. Inside this method you should send a request to the payment gateway and parse the gateway response.
The method should be defined in the following way:
public function process_payment_form($data, $host_obj, $order, $back_end = false)
{
  ...
}
The method has 4 parameters:
- $data - an array which contains the payment form field values, provided by the customer.
- $host_obj - a PHP object which contains all fields defined in the build_config_ui() method of the payment module class. We described this method in the Developing payment modules article, in the Building the payment module configuration form section. Use this object for loading the payment module configuration parameters.
- $order - an instance of the Shop_Order class, containing all order dertails.
- $back_end - indicates whether the payment action is called from the Administration Area. We will describe this case later in this article.
Content of the process_payment_form() method depends on a specific payment gateway requirements, but basically the method code consists of 3 parts.
public function process_payment_form($data, $host_obj, $order, $back_end = false)
{
  /*
   * Validate input data
   */

  try
  {
    /*
     * Prepare and send request to the payment gateway, and parse the server response
     */
  }
  catch (Exception $ex)
  {
    /*
     * Log invalid payment attempt
     */
  }
}
Validating the user input data
Before sending a request to the payment gateway, the form data has to be validated by the payment module. For this purpose we use the handy Phpr_Validation class, which allows to define validation rules and then validate any input array. In the process_payment_form() method we need to validate elements of the first method parameter ($data). Below is a code which is used to validate the input data in the Beanstream payment module:
$validation = new Phpr_Validation();
$validation->add('FIRSTNAME', 'Cardholder first name')->fn('trim')->required('Please specify a cardholder first name.');
$validation->add('LASTNAME', 'Cardholder last name')->fn('trim')->required('Please specify a cardholder last name.');
$validation->add('EXPDATE_MONTH', 'Expiration month')->fn('trim')->required('Please specify a card expiration month.')->regexp('/^[0-9]*$/', 'Credit card expiration month can contain only digits.');
$validation->add('EXPDATE_YEAR', 'Expiration year')->fn('trim')->required('Please specify a card expiration year.')->regexp('/^[0-9]*$/', 'Credit card expiration year can contain only digits.');
$validation->add('PHONE', 'Phone number')->fn('trim')->required('Please specify a phone number.');

$validation->add('ACCT', 'Credit card number')->fn('trim')->required('Please specify a credit card number.')->regexp('/^[0-9]*$/', 'Please specify a valid credit card number. Credit card number can contain only digits.');
$validation->add('CVV2', 'CVV2')->fn('trim')->required('Please specify CVV2 value.')->regexp('/^[0-9]*$/', 'Please specify a CVV2 number. CVV2 can contain only digits.');

try
{
  if (!$validation->validate($data))
    $validation->throwException();
} catch (Exception $ex)
{
  $this->log_payment_attempt($order, $ex->getMessage(), 0, array(), array(), null);
  throw $ex;
}
This code is similar for many payment gateways, you only need to find out which fields are required for your payment gateway and what validation rules should be applied to each field.
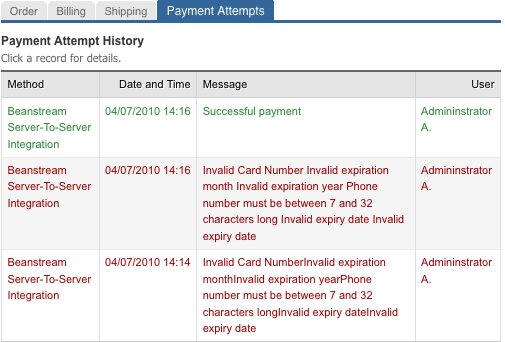
Please note which the try..catch block is used to catch the validation error in order to log the payment attempt. Inside the catch block the log_payment_attempt() method is called. It allows to save the payment attempt into the database and then display it on the Payment Attempts tab of the Order Preview page in the Administration Area:

The log_payment_attempt() method is a built-in method of any payment module class, defined in the Shop_PaymentType class. The method has the following parameters:
- $order - an order object to log the payment attempt for
- $message - a message string, describing the attempt result. For successful payments you can use the "Successful payment" string. For error conditions use an error message returned by the payment gateway.
- $is_successful - indicates whether the attempt was successful.
- $request_array - a list of fields which the payment module posted to the payment gateway.
- $response_array - a list of fields received from the payment gateway, as array.
- $response_text - a raw response text received from the payment gateway. In some cases the response text is not available, and you can pass the NULL value to the parameter.
- $ccv_response_code - card code verification response code, optional.
- $ccv_response_text - card code verification response text, optional.
- $avs_response_code - address verification response code, optional.
- $avs_response_text - address verification response text, optional.
Payment attempts which you log using the log_payment_attempt() method are displayed on the Order Preview page:

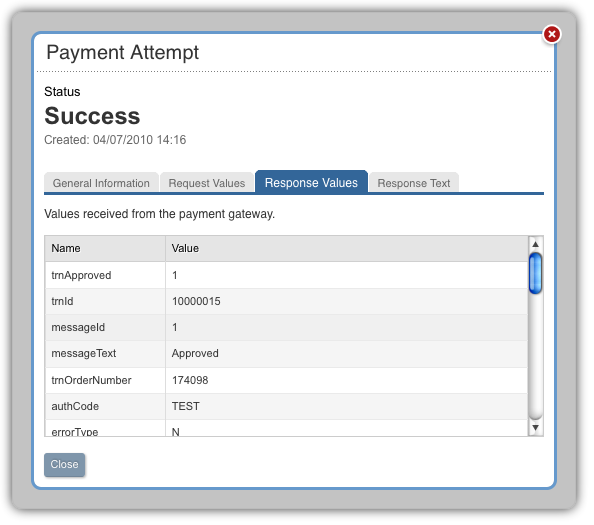
LemonStand users can click on a payment attempt record and view all details which you specified in the log_payment_attempt() method call:

As payment attempt details can be accessed by LemonStand users, you should remove any credit-card and payment gateway API credentials data from the request and response arrays and from the gateway raw response text.
We will demonstrate how you can remove specific elements from request and response arrays later in this article. During the form validation phase we do not have the request, response and raw response text available, so we pass the empty arrays to the response and request parameters, and the NULL value to the raw response text parameter.
Preparing and sending a request to the payment gateway
The code for preparing and sending the response and parsing the payment gateway request should be wrapped into the try..catch block in order to log invalid payment attempts.
Each payment gateway requires a specific way of sending a payment request and requires specific format of the request data. Some gateways require request to be sent as POST form data. Others work as a web service and require expect requests in SOAP format. Also, some payment gateways require a XML document to be sent in the request. Please refer to your payment module integration guide for the request implementation details.
Below is the request implementation from the Beanstream payment module. The Beanstream gateway requires the request to be sent as a POST data.
$fields = array();
$fields['requestType'] = 'BACKEND';
$fields['merchant_id'] = $host_obj->merchant_id;
$fields['trnCardOwner'] = $validation->fieldValues['FIRSTNAME'].' '.$validation->fieldValues['LASTNAME'];
$fields['trnCardNumber'] = $validation->fieldValues['ACCT'];
$fields['trnCardCvd'] = $validation->fieldValues['CVV2'];
...
$response = $this->post_data($fields);
The post_data() is defined in the Beanstream payment module in the following way:
private function post_data($fields)
{
  $poststring = $this->format_form_fields($fields);

  $ch = curl_init();
  curl_setopt( $ch, CURLOPT_POST, 1 );

  curl_setopt($ch, CURLOPT_SSL_VERIFYHOST,0);
  curl_setopt($ch, CURLOPT_SSL_VERIFYPEER, 0);
  curl_setopt( $ch, CURLOPT_RETURNTRANSFER, 1);
  curl_setopt($ch, CURLOPT_URL, 'https://www.beanstream.com/scripts/process_transaction.asp');
  curl_setopt( $ch, CURLOPT_POSTFIELDS, $poststring);

  $response = curl_exec($ch);

  if (curl_errno($ch))
    throw new Phpr_ApplicationException( "Error connecting the payment gateway: ".curl_error($ch) );
  else
    curl_close($ch);

  return $response;
}
The post_data() method in the Beanstream payment module implementation returns a string received from the payment gateway. Inside the process_payment_form() method we parse the server response using the following line of code:
$response_fields = $this->parse_response($response);
The parse_response() method is implemented in the Beanstream payment module class. It parses the response string and returns an array containing all received variables in the following format:
array(
  ['trnApproved']=>1,
  ['messageText']=>''
  ...
After parsing the response strong the module determines whether the transaction has been successful. The Beanstream gateway returns the transaction status in the trnApproved response field. The 1 value corresponds to successful transactions. The code below tests the field value and throws the exception if the transaction was not successful, of if the field is not presented in the response data.
if (!isset($response_fields['trnApproved']))
  throw new Phpr_ApplicationException('The card was declined by the payment gateway.');

if (!isset($response_fields['trnApproved']) || ($response_fields['trnApproved'] !== '1'))
  throw new Phpr_ApplicationException('The card was declined by the payment gateway.');
And finally, if the transaction has been successful, the payment module logs the payment attempt, updates the order status and marks the order as processed:
/*
 * Log the successful payment attempt
 */
$this->log_payment_attempt($order, 'Successful payment', 1, $this->prepare_fields_log($fields), $this->prepare_fields_log($response_fields), $this->prepare_response_log($response));

/*
 * Update the order status
 */
Shop_OrderStatusLog::create_record($host_obj->order_status, $order);

/*
 * Mark the order as processed
 */
$order->set_payment_processed();
The log_payment_attempt() method has been described earlier in this article. Please note that this time we pass real values to the request, response and raw text response method parameters. Before saving the request and response details, we clean the arrays using the prepare_fields_log() method. Inside this method we remove some array elements, which should not be visible on the payment attempt details popup window. Each payment module has its own set of "secret" fields - such as the API user name and password. The credit card parameters should also be removed. In the Beanstream payment module we implemented the data cleaning method in the following way:
private function prepare_fields_log($fields)
{
  if (isset($fields['merchant_id']))
    unset($fields['merchant_id']);

  if (isset($fields['trnCardNumber']))
    $fields['trnCardNumber'] = '...'.substr($fields['trnCardNumber'], -4);

  if (isset($fields['trnCardCvd']))
    unset($fields['trnCardCvd']);

  return $fields;
}
It removes the Merchant Id field (this is a payment gateway specific field), the card verification number field, and updates the card number field value, leaving only 4 last digits.
To the last parameter of the log_payment_attempt() method we pass the response string received from the payment gateway. Some gateways return credit card information and API credentials in the response string, and such information should be removed from the response string before saving it to the database. Usually we define the prepare_response_log() method which processes the response string. Beanstream does not send any sensitive information in the response, so the method implementation for the Beanstream just returns the input string:
private function prepare_response_log($response)
{
  return $response;
}
To change the order status the code calls the Shop_OrderStatusLog::create_record() method:
Shop_OrderStatusLog::create_record($host_obj->order_status, $order);
The Shop_OrderStatusLog::create_record() method has 2 parameters - the destination status identifier and the order object. The order status identifier is available through the $host_obj->order_status field.
To mark the order as paid the code uses the following call:
$order->set_payment_processed();
Logging invalid payment attempts
The catch part of the try..catch blog which wraps the request sending and response parsing code, should contain PHP code for logging invalid payment attempts. Below is a code example from the Beanstream payment module:
...
catch (Exception $ex)
{
  $fields = $this->prepare_fields_log($fields);

  $error_message = $ex->getMessage();
  if (isset($response_fields['messageText']))
    $error_message = $response_fields['messageText'];

  $this->log_payment_attempt($order, $error_message, 0, $fields, $this->prepare_fields_log($response_fields), $this->prepare_response_log($response));

  if (!$back_end)
    throw new Phpr_ApplicationException($ex->getMessage());
  else
    throw new Phpr_ApplicationException($error_message);
}
You can use the similar code for all payment gateways, with one exception. The code tries to load the error message, received from the payment gateway, from the messageText response field. This field is specific for the Beanstream payment gateway, and you need to refer to your payment gateway integration guide to find out which response field contains the error message.
Back-end payment forms
All payment modules must provide a form for paying an order from the LemonStand Administration Area. Payment modules which implement the server-to-server integration method must implement the build_payment_form() method. This method should contain a PHP code for building the payment form for the Administration Area. This method is similar to the define_form_fields() method of the model class, which we described in the Forms article. Below is a method implementation from the Beanstream payment module:
public function build_payment_form($host_obj)
{
  $host_obj->add_field('FIRSTNAME', 'First Name', 'left')->renderAs(frm_text)->comment('Cardholder first name', 'above')->validation()->fn('trim')->required('Please specify a cardholder first name');
  $host_obj->add_field('LASTNAME', 'Last Name', 'right')->renderAs(frm_text)->comment('Cardholder last name', 'above')->validation()->fn('trim')->required('Please specify a cardholder last name');
  $host_obj->add_field('ACCT', 'Credit Card Number', 'left')->renderAs(frm_text)->validation()->fn('trim')->required('Please specify a credit card number')->regexp('/^[0-9]+$/', 'Credit card number can contain only digits.');
  $host_obj->add_field('CVV2', 'CVV2', 'right')->renderAs(frm_text)->validation()->fn('trim')->required('Please specify Card Verification Number')->numeric();
  $host_obj->add_field('PHONE', 'Phone number')->renderAs(frm_text)->validation()->fn('trim')->required('Please specify a customer phone number')->numeric();

  $host_obj->add_field('EXPDATE_MONTH', 'Expiration Month', 'left')->renderAs(frm_text)->validation()->fn('trim')->required('Please specify card expiration month')->numeric();
  $host_obj->add_field('EXPDATE_YEAR', 'Expiration Year', 'right')->renderAs(frm_text)->validation()->fn('trim')->required('Please specify card expiration year')->numeric();
}
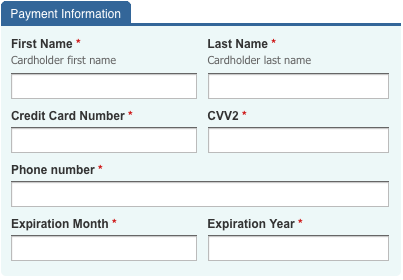
It creates the following payment form in the Administration Area:

Please note that you should use same set of fields, and the same form field names in the back-end payment form and in the front-end payment form partial.
Formatting XML requests
Some payment gateways expect a request to be formatted as a XML document. There is a handy way of formatting XML documents in the payment module classes. The format_xml_template() allows you to specify the XML template file, pass required parameters into it and obtain a formatted XML strong. The template file should be placed to the payment module directory. For example:
$request_str = $this->format_xml_template('request.xml', array('order'=>$order));The code processes the request.xml file and returns the XML string ready to be sent to the payment gateway. You can pass any parameters required for formatting the XML document to the template, using the second method parameters.
Inside the XML template file (request.xml in our example), you can access the passed parameters and use any PHP structures. For example:
<request_data>
  <order>
    <id><?= $order->id ?></id>
    <total><?= $order->total ?></total>
  </order>
  <customer>
    <first_name><?= h($order->billing_first_name) ?></first_name>
  </customer>
</request_data>
For the logging purposes you need to present the request XML document as an array. You can use the Core_Xml::to_plain_array() function for converting an XML document into an array. But first you need to create a XML document object from the XML string:
$doc = new DOMDocument('1.0');
$doc->loadXML($request_str);
After that you can obtain the array suitable for passing into the log_payment_attempt() method:
$fields = Core_Xml::to_plain_array($doc, true);
Conclusion
The complexity of implementing of a specific payment module depends on complexity of the payment gateway integration API and on the quality of the payment gateway integration guide. LemonStand API allows to implement almost any payment module. We cannot provide you with all possible solutions and code examples in a single Wiki article. We suggest you to explore existing payment modules and learn how they solve different tasks. Here is a list of some existing server-to-server payment modules:
- HSBC API - sends the XML request to the payment gateway. In this module we prepare the XML document manually, step by step. The module file name is shop_hsbc_payment.php.
- Authorize.Net AIM - Authorize.Net Advanced Integration Method implementation. This module sends a POST request to the payment gateway, using the CURL library. The file name is shop_authorize_net_aim_payment.php.
Previous: Using a Redirection Integration Method
Return to Guide for Developing a Payment Module
